
Pattern Corrections
Even though my patterns undergo vigorous testing, I find that there are occasional corrections and clarifications needed after a pattern is printed/downloaded. Before you begin making a pattern, check here first to make sure all of your information is up to date. Corrections are listed below, in order of newest to oldest. (If you can’t find a pattern listed below, that means there are no corrections.)
You can find corrections for the Charm School book here. There are currently no corrections for the Jelly Filled book. Happy quilting!
– Vanessa
#260 Garden Party
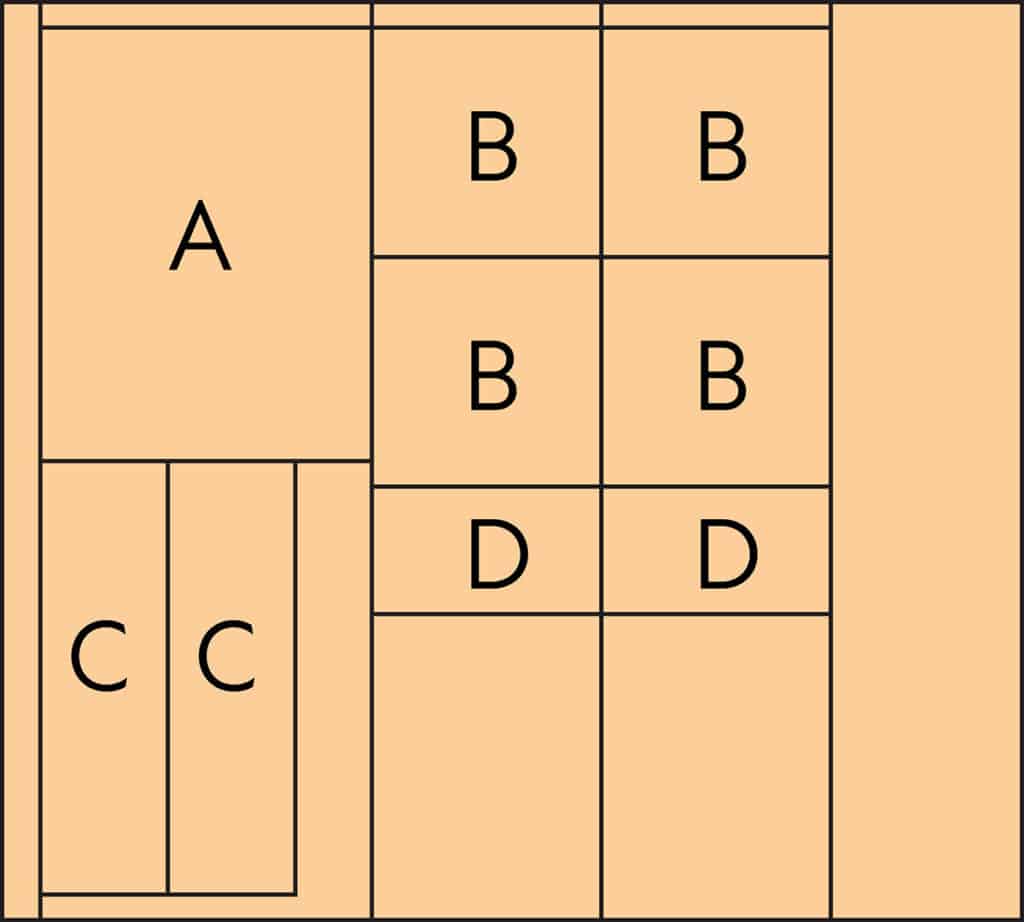
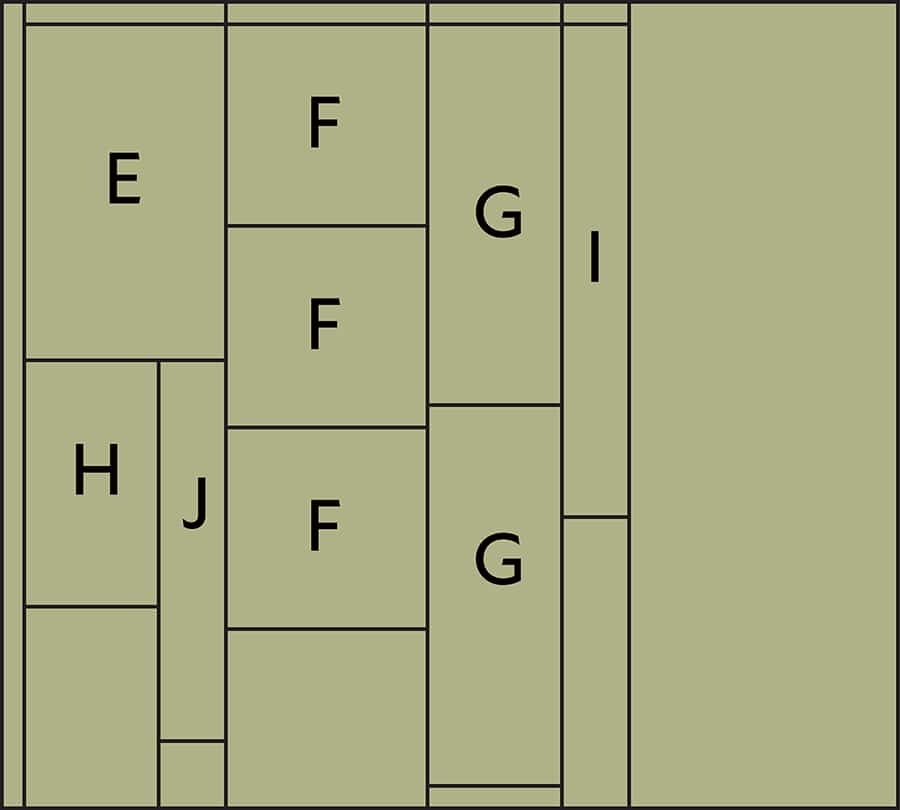
GENERAL CUTTING NOTE: The fat quarter cutting diagrams for flower/leaf prints shown in the pattern accommodate a unidirectional print that runs perpendicular to the selvedge… if a unidirectional print runs parallel to the selvedge, here are alternate cutting diagrams you can use:
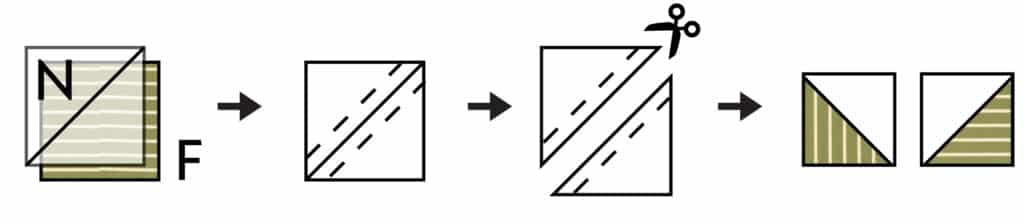
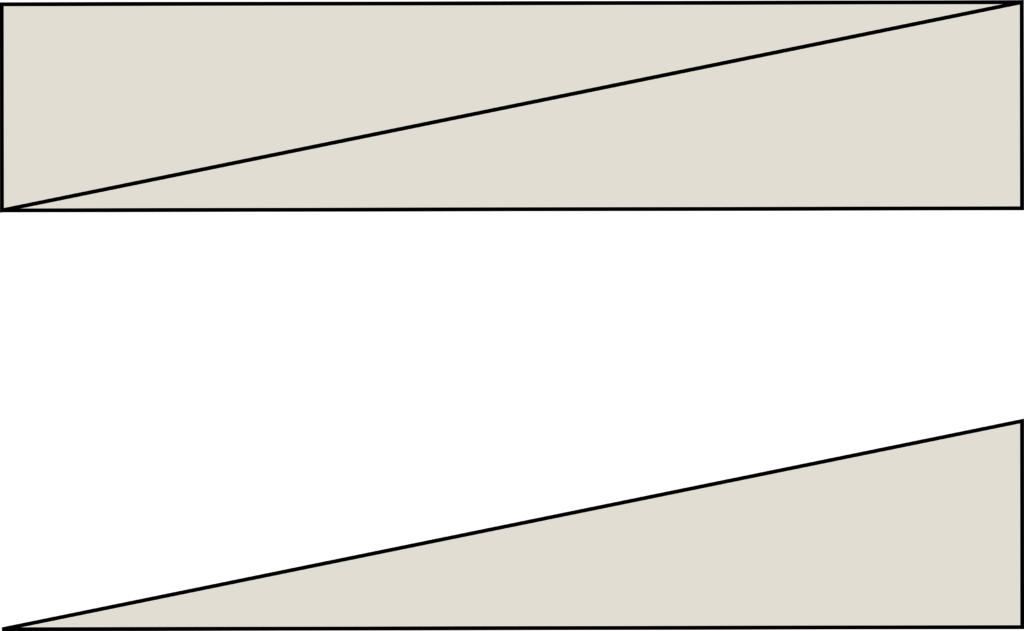
UNIDIRECTIONAL LEAF PRINTS: When using a bidirectional print for the leaves (like a stripe), please note you are going to end up with a mix of orientations when making the half-square triangles (HSTs) in Steps #4-6 using the (3) F squares. (There is no way to get the stripe to run the same direction with how we arrange them into the leaf-stem unit in Step #5 without an extra step or two.) The diagram below shows an example of how a single HST pair will come out.

Because we are starting with an odd number of F squares, there is no way to get then all facing the right way. They will end up looking like the leaf-stem unit labeled (A) below where half are oriented differently.
However, there is an extra step you can take if you want them to face one direction as shown in the leaf-stem unit labeled (B). Cut an extra F square. (You will also need to cut an extra N background square.) You will orient (2) of the F squares with the stripe running vertically as shown in the HST diagram above. (3 of the 4 resulting HSTs can go in the same column.)
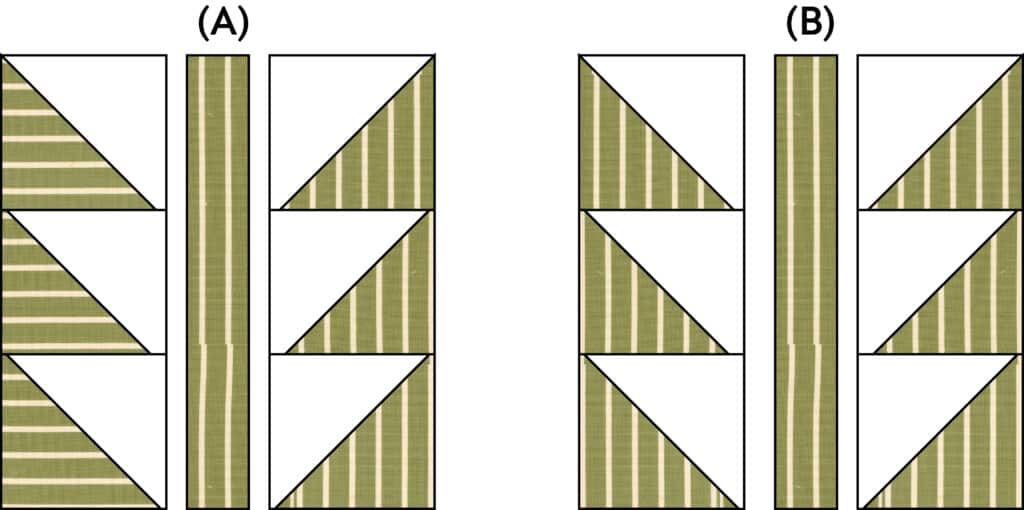
Next, orient the other (2) F squares with the stripe running horizontally as shown in the HST diagram below. (3 of the 4 HSTs will go in the other column.) Hope that makes sense!
On Page #2 of the cutting – under the white background cutting, omit the Q rectangles (if there is a listing for them).
On Page #7 – Step #14, the rectangles added to the top and bottom of the unit are BB rectangles (1-3/4″ x 4-1/2″ rectangles), not Y squares as mistakenly listed.
Zip Zip Go Bag (from the Wild Honey subscription box)
At the end of Step #7 – after basting the vinyl pocket to the bottom of the exterior piece, topstitch the top part of vinyl pocket (the binding-edge above the zipper) in place. You definitely want that pocket stitched in place before final bag assembly in Steps #8-9!
#251 Lucky Stars
No errors – but if you’d like to see some fun color placement options or are interested in how to adapt the pattern for a Jelly Roll, check out this printable page HERE.
#247 Bloom & Buzz
On Page #2 of the cutting – under the Background cutting – it says to cut (7) strips 1-3/4″ x WOF for the R rectangles. This is incorrect – you only need to cut (4) strips to get the (32) R rectangles.
#244 Sew Jolly Pillow
For the “face print” cutting: You will need to cut (2) A rectangles, not (1).
For PDF versions downloaded before 11/10/24: On page 1 under the background print cutting, cross out the (2) background rectangles 2-1/2″ x 14″ + (2) background rectangles 1-3/4″ x 16-1/2″. They are not needed! (The V and W rectangles are the correct block borders.)
#241 Holiday House
In Step #19, the last sentence is a bit obscured by the diagram. It should say “Unfinished block should measure 11″ x 13-1/4″. Make (12).“
#238 Flower Press
In Step #11, the unit should finish at 2-1/2″ x 12-1/2″ (not 1-1/2″ x 6-1/2″ as it incorrectly states in the original printing).
#235 Persnickety
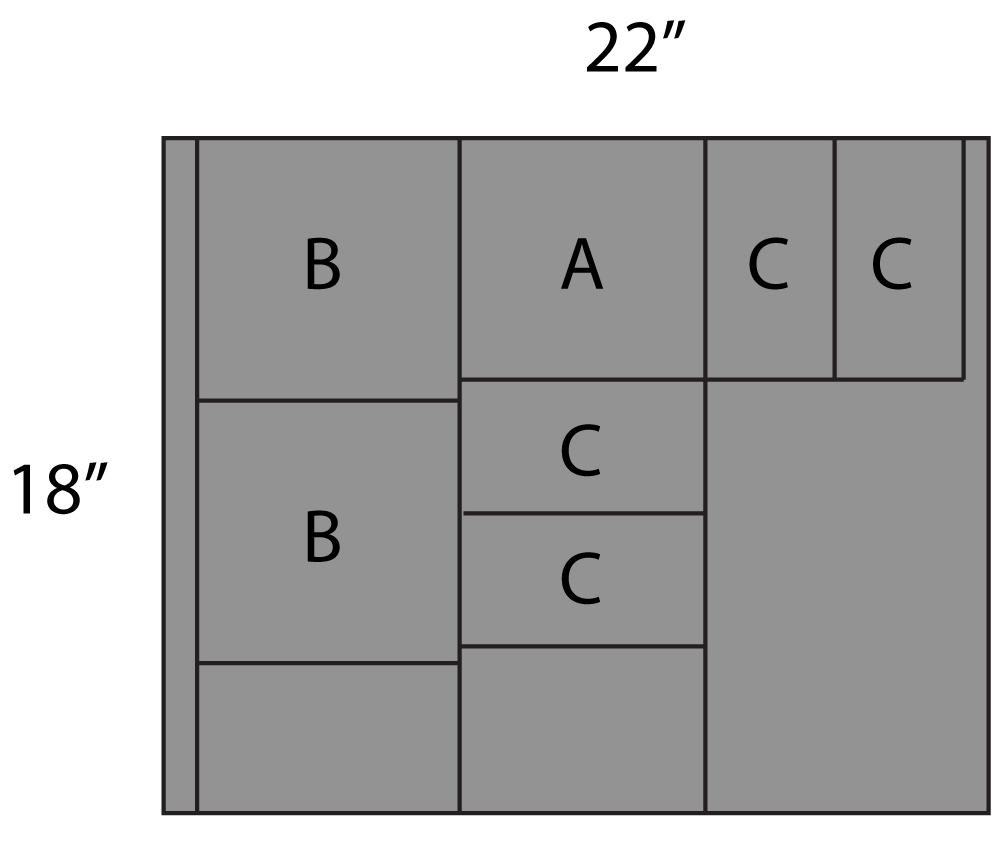
If using a Layer Cake, subdivide each Layer Cake square into (4) squares 5″ x 5″ before making the A/B/C subcuts. Here’s a cutting diagram for reference:
The Monster Mash Sampler Quilt
Just wanted to add another easy place to find the materials list – view it here. You can also read full details about the Monster Mash quilt along here.
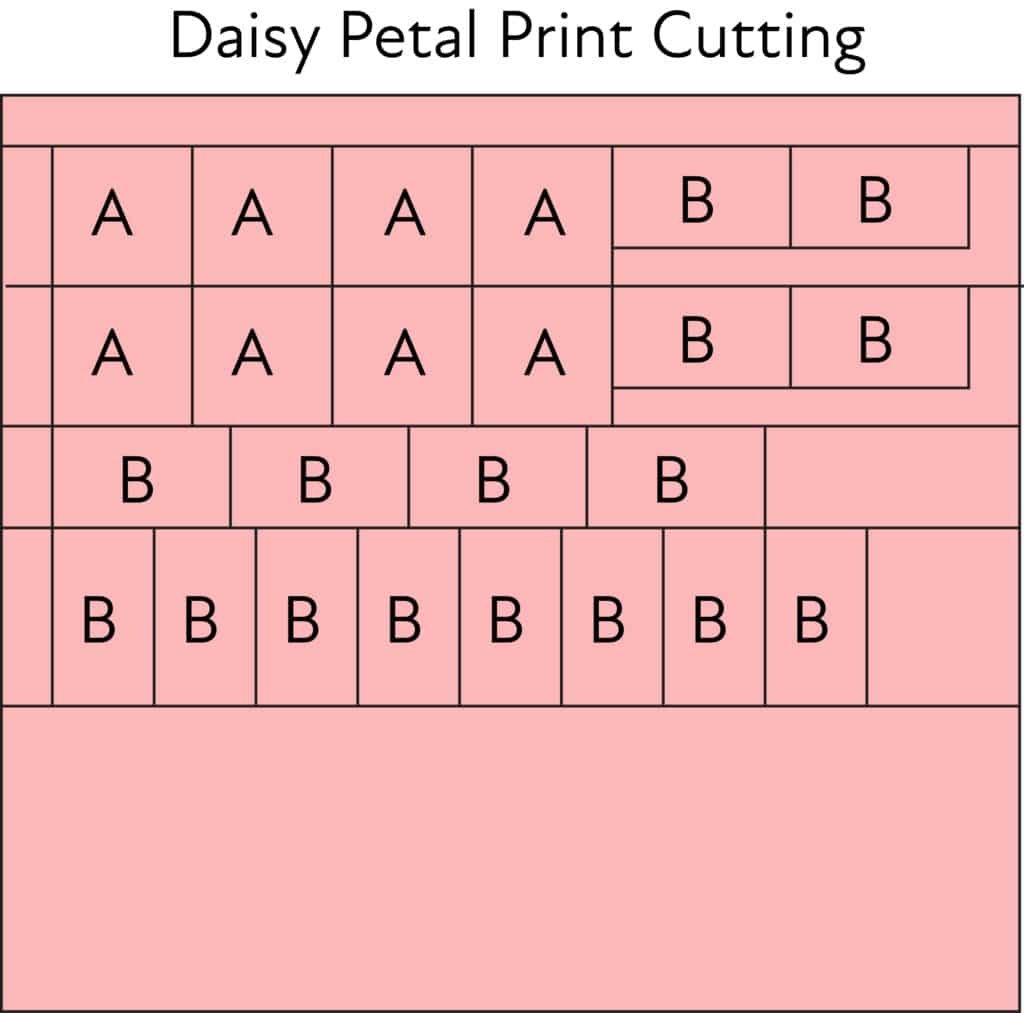
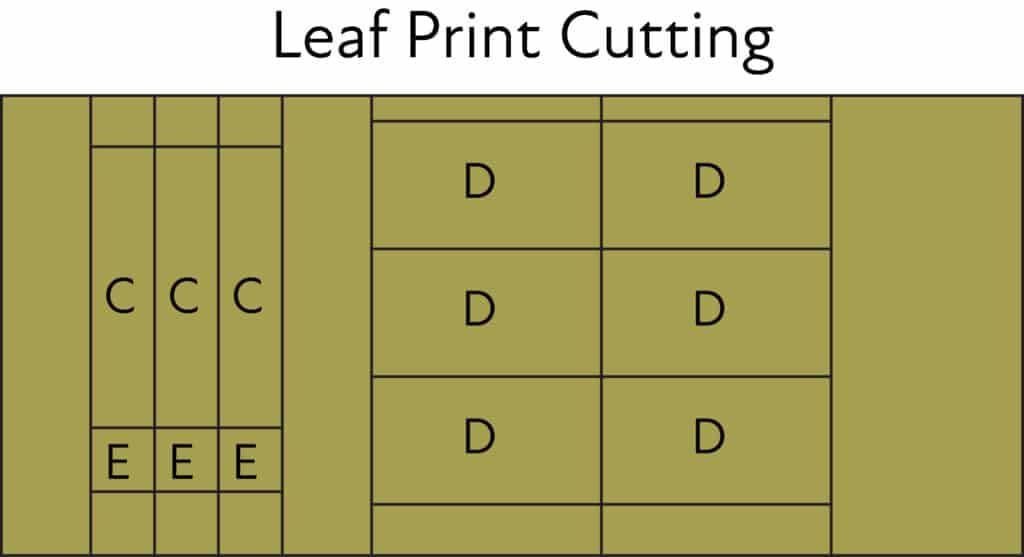
#231 Pushing Up Daisies
In Step #22, last sentence should say: “Unfinished unit should measure 10-1/4″ x 11″.”
I’m also adding a couple cutting diagrams for the fat quarters (daisy petal prints) and fat eighths (leaf prints). There is plenty of room to get your cuts, but thought these might be helpful!
#227 Iconic 2
Finished quilt size is 72-1/2″ x 78-1/2″ (not 66-1/2″ x 72-1/2″). This requires an adjustment to the backing fabric from 4-1/2 yard to 5 yards. Batting needed is 81″ x 87″.
Also a minor note – it might not even be something you would notice – but the quilt top arrangement diagrams on pages 4-5 shows the seams of each block in the wrong places. This is where the seams will show.
#222 Iconic
Here’s a little note to help with pressing in Step #5:
NOTE: To help the seams “nest” easier, alternate the pressing direction for half the blocks (i.e. press the seams of (18) blocks toward the center and (18) blocks away from the center). If you have a specific layout in mind, the pressing direction needs to alternate block to block.
#221 – Stairway to Heaven
There is a minor flaw in the original quilt mockup. (You might not have even noticed, but some of the blocks were “mirrored” rather than rotated 180 degrees.) The overall look is the same. Here is the corrected mockup:
PS5180 – Giving Season
You do not need the “F” rectangle in background fabric.
In Step #5 where it lists everything needed to make (1) gift block, it should list (2) J squares instead of just (1). (You will have cut the correct amount and would probably figure that out just by looking at the diagram.)
#218 St. Nick
The SKU listed for the nose print should be #9900 104 “Hay” (not #9900 184).
#215 Dashing
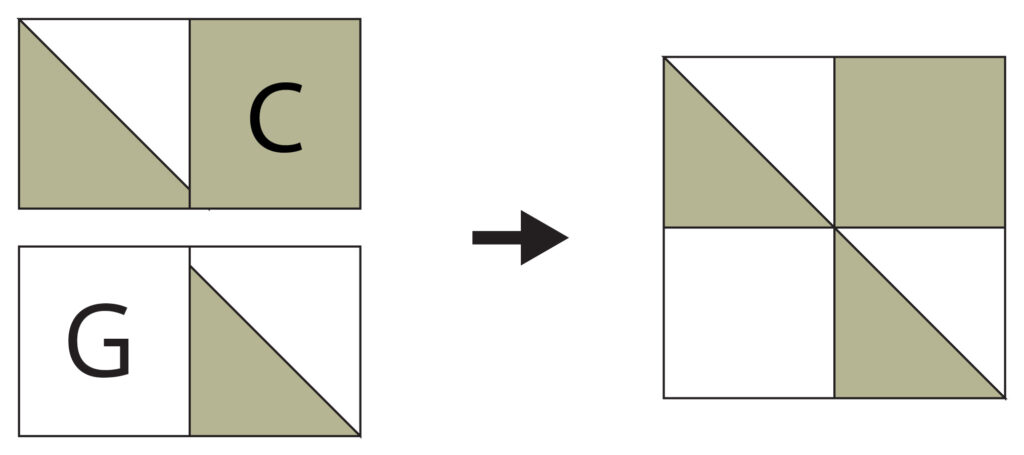
Step #6 should list (1) “G” square (not an “F” square since it was already use in the previous step):
“Sew into rows: (2) HSTs from Step #5, (1) C square of print #1, and (1) G background square…”
Here is the updated diagram:
#214 Jolly Holiday
In the original printing (in Christmas Eve fabric), the SKU listed for the nose print should be #9900 104 “Hay” (not #9900 184).
#213 Good Tidings
There’s a typo in Step #14 – it should say to “sew along the 1-1/2” side.”
#210 Bloomers
No a correction so much as a quick note. In the materials, you will notice separated listings of “1 yard of white fabric” and “5 yards of background fabric.” They are listed separately in case you want the “white” within the flowers to be a different print or color than the “white” background. They may very well be the same print in which case you just combine them to be 6 yards total.
#209 Gift Swap
- CORRECTION: Finished quilt size is 54½” x 63¼”. Batting size decreases to 63″ x 72″.
- CORRECTION: Step #3 of the Cutting instructions should say to cut (12) E squares 5″ x 5″ (and no D rectangles)… The original instructions say to cut 6 D rectangles + 6 E squares which is not correct. If you’ve already cut them, good news – it’s an easy fix! Just trim 6 D rectangles to 5″ x 5″ squares and add them to the E squares.
- Here is the updated assembly diagram for Step #11 to replace the top row of D rectangles with E squares:
#200 Nice List
- CORRECTION: You will need 3-1/4 yards of the background fabric – the 3 yards originally called for is a little short.
- CORRECTION: In Step #3 of the Cutting (page 1), the second bullet should say to cut “(7) strips 7-1/2″ x WOF. Subcut (28) E rectangles 7-1/2″ x 10″ (4 per strip).” (6 strips is not enough as you cannot get 5 per strip as originally stated… which is why the background yardage got bumped up.)
- NOTE: The cover quilt (mocked up in Christmas Morning fabric) uses SKU #5146-12 “Comfort” in “Silver” as the background print. This print reads as a solid overall – but is technically “unidirectional” (which the background cutting instructions do not take into account). If this is something that will bother you, there’s an easy tweak. Instead of cutting (3) strips 5-1/2″ x WOF for the H rectangles, cut (5) strips 3″ x WOF and cut the (32) H rectangles from that. (PS I pieced the original quilt without paying attention to background print direction and do not find it to be bothersome at all! I think it would require real scutiny to even notice.)
#199 Yule Tree
- CORRECTION: Step #12 should say to make a diagonal line on the back of (1) light “E” square (not “A” square). (The diagram is correct.)
#194 Spring Fling
No corrections but I do have some alternate cutting instructions listed for making the Magic Dot version since it combines several of the yardages:
#191 Starstruck 2
- NOTE: Materials Needed assume 82″ WOF (width of fabric). Check this before purchasing yardage (or consider bumping it up to 2-1/2 yards background fabric).
- CORRECTION: When adding the border in Step #14, the average width should be approx. 68.5″ wide (not 72.5″ wide).
#189 Kiss & Makeup Hanging Travel Bag
- TIP: In Steps #14 and #15: Keep in mind you are adding pleats to only ONE of the 14″ sides of the pocket pouch rectangle (and lining rectangle) in Step #14. The other 14″ side of each is what you will be bringing RST with the 14″ base of the vinyl in Step #15. Don’t let the addition of the pleats in Step #14 throw you off in locating the 14″ side, it’s there, I promise!
#185 Double Dutch
- TIP: For a scrappier look, you can replace the 3 1/4 yards of background fabric with 28 fat eighths or 14 quarter-yards. If using quarter-yards, please note you can use quarter-yards cut 9″ x 44″ – OR – fat quarters cut 18″ x 22″. (There is no difference since you can fold either one in half to 9″ x 22″ and follow the fat eighth cutting diagram. (The pattern incorrectly states to fold to 18″ x 22″–and that’s a typo–you’ll fold to 9″ x 22″.)
- CORRECTION: Finished block is 9¼” x 9¼” (not 10″ x 10″ as stated in the original printing). This won’t affect assembly but will reduce the finished quilt size to 65¼’’ x 74½’’. NOTE: The original copies of this pattern were pulled and destroyed as soon as the error was discovered. Unfortunately, copies were aready starting to circulate–so check your copy to see if it has the correct finished block size listed. If so, there are no further corrections. If you have an old copy, contact me to send a replacement copy as you will need new cutting instructions.
#173 Holland
TIP: A tweak to cutting the green fabric was added to accommodate unidirectional prints; in the “Cutting” section, the scrappy version Step #2 should list the following for each ½-yard of green fabric:
· (2) strips 8½’’ x WOF. Subcut (8) 5¾’’ x 8½’’ rectangles (4 per strip).
· From the excess, cut (4) 2’’ x 8½’’ rectangles.”
#172 Pretty Please
CORRECTION: A little typo in Step #1 of the Cutting on page 2 for the 84″ x 84″ version. You’ll trim (33) 5″ x 5″ charm squares to (33) 4.5″ x 4.5″ squares (not 336).
#169 Little Cottontail
CORRECTION: For Step #14, the unfinished size of the unit should measure 2½” x 2½”. (The initial printing said 4½” x 4½”. This error was corrected within hours of the PDF pattern being released and only affects original batch of printed copies.)
#165 Easy Breezy
CORRECTION: Step #14 should say “Trim 4 background strips 3” x 80” to match the measurement.” (NOT 4” x 80”)
#164 Scrappy Sunflowers
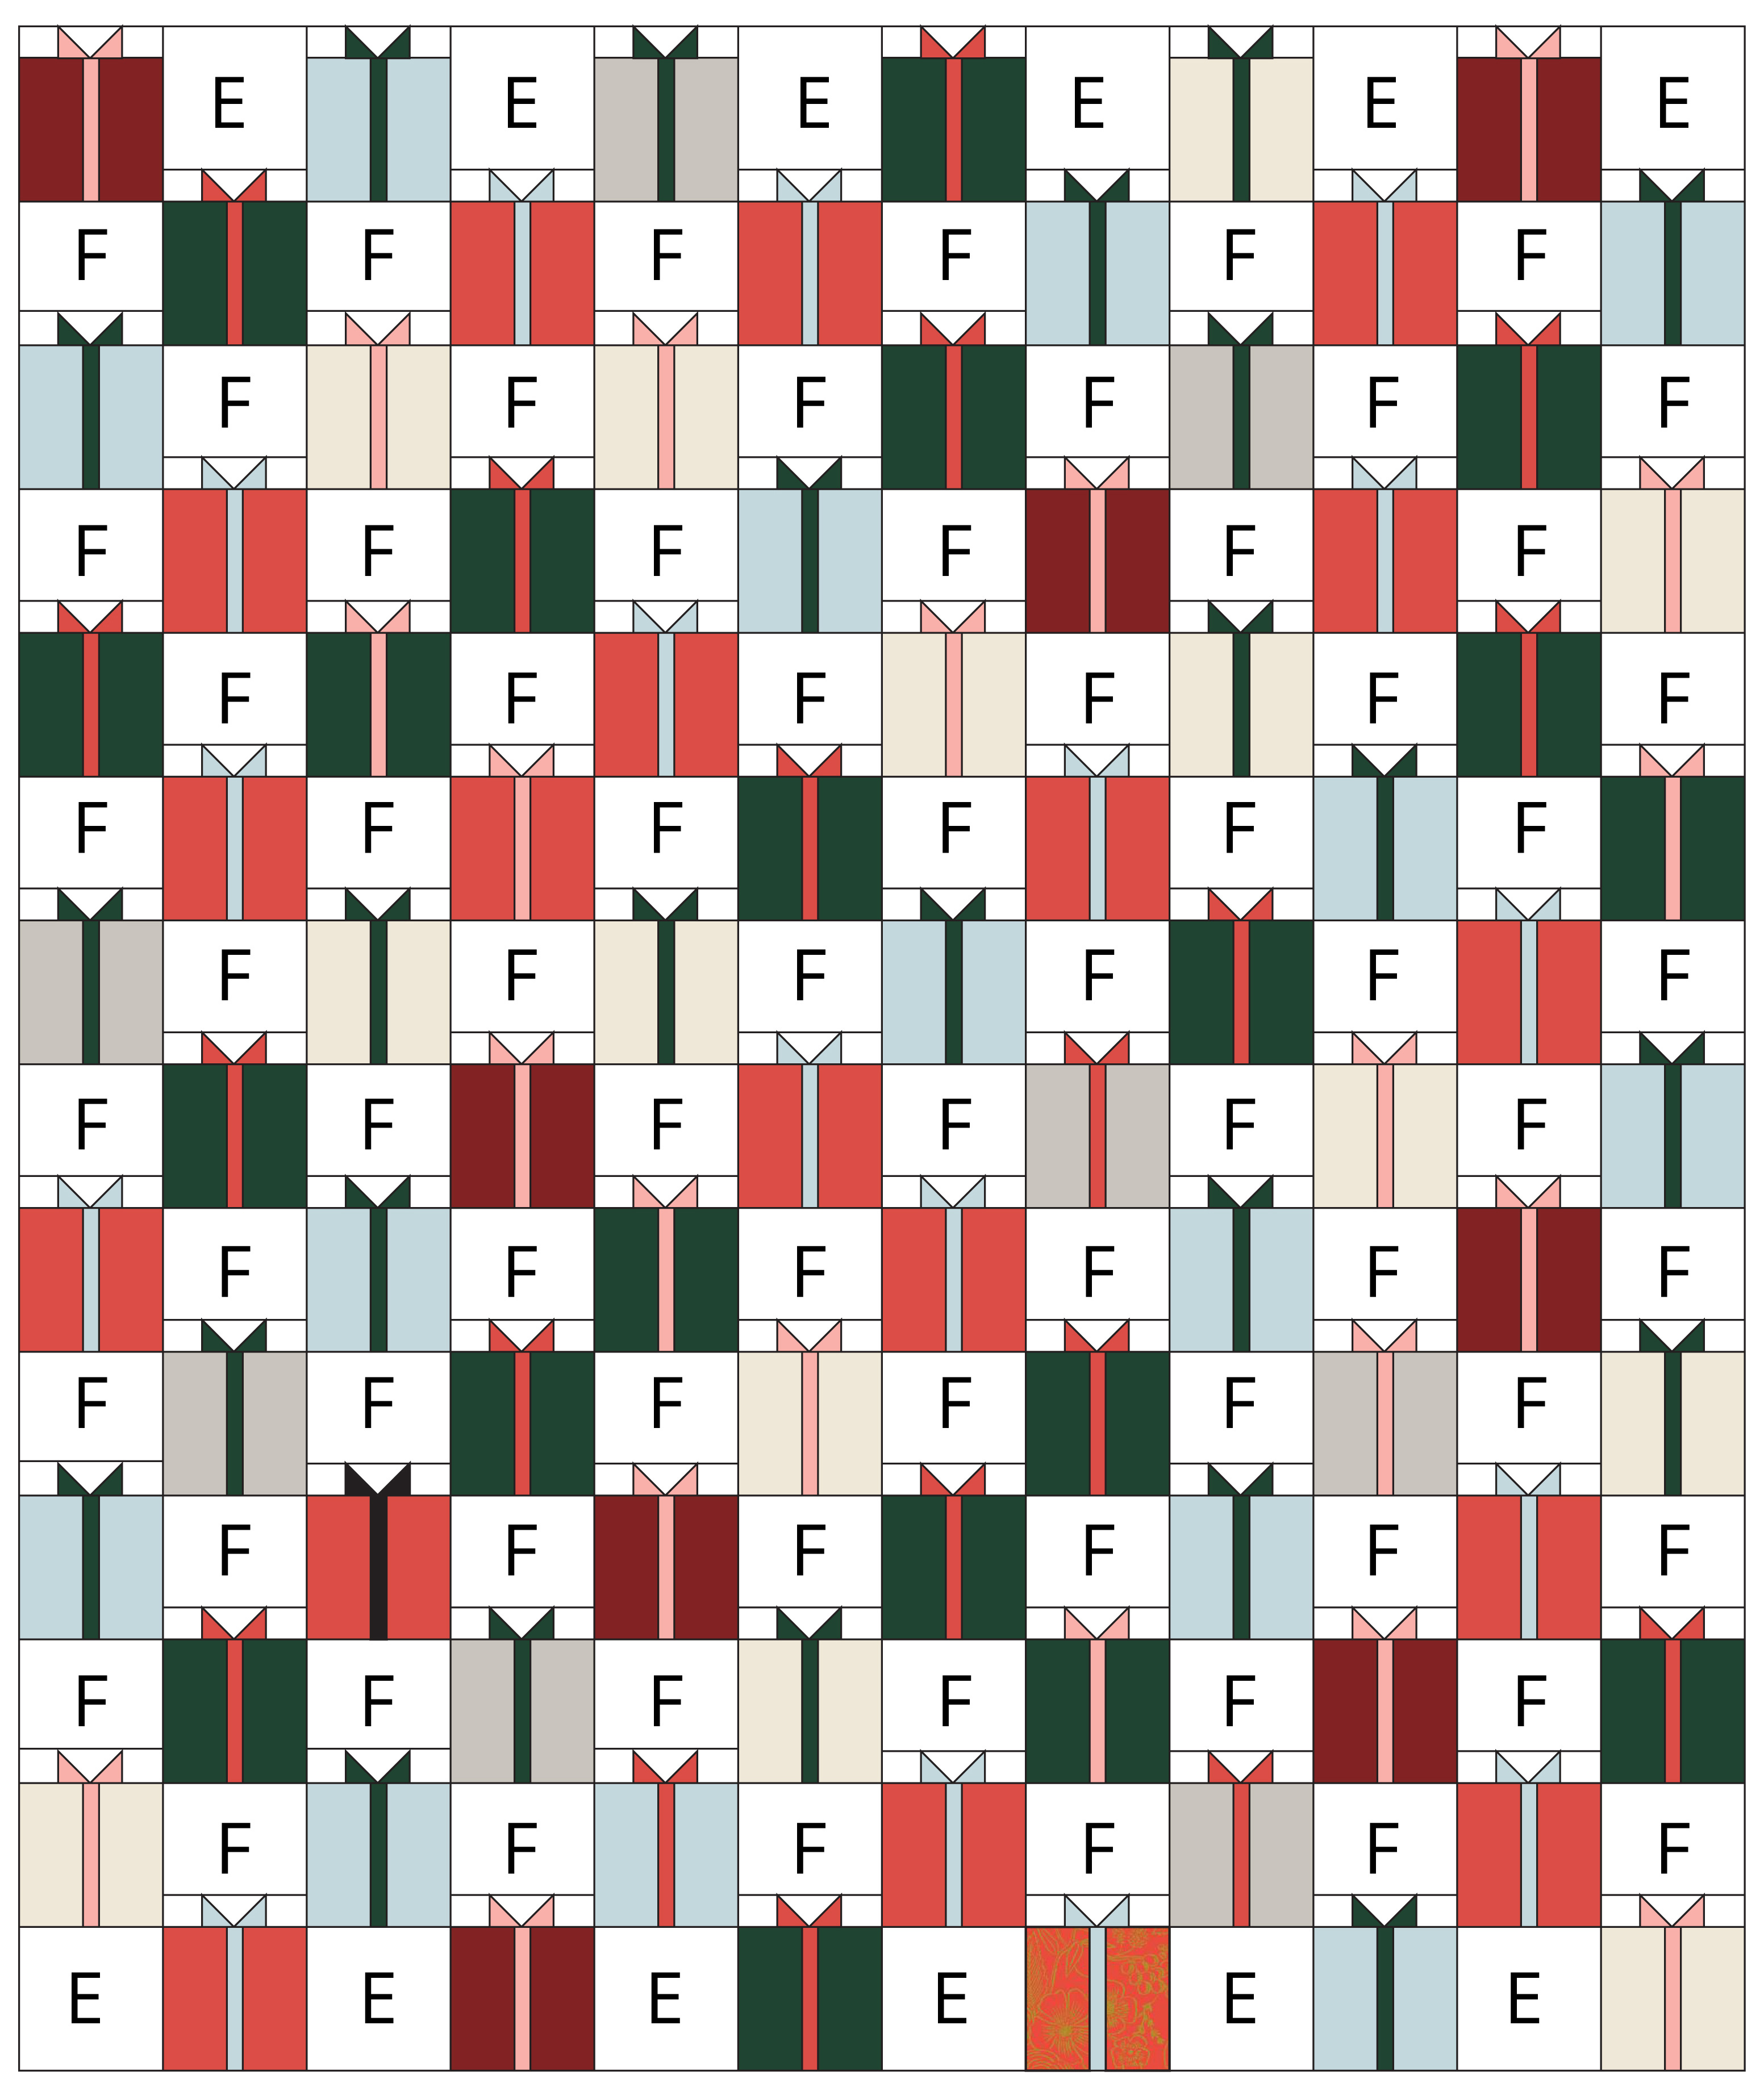
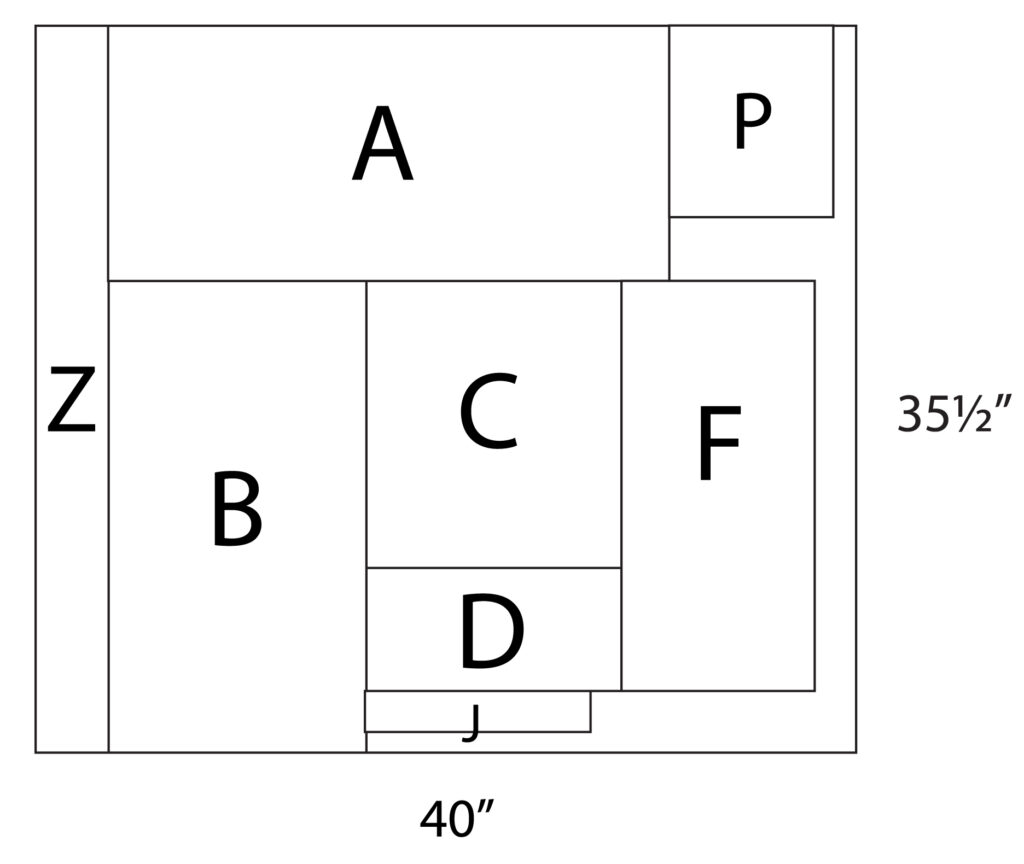
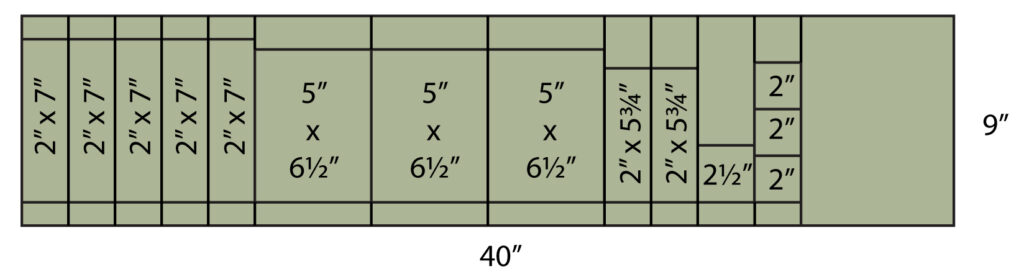
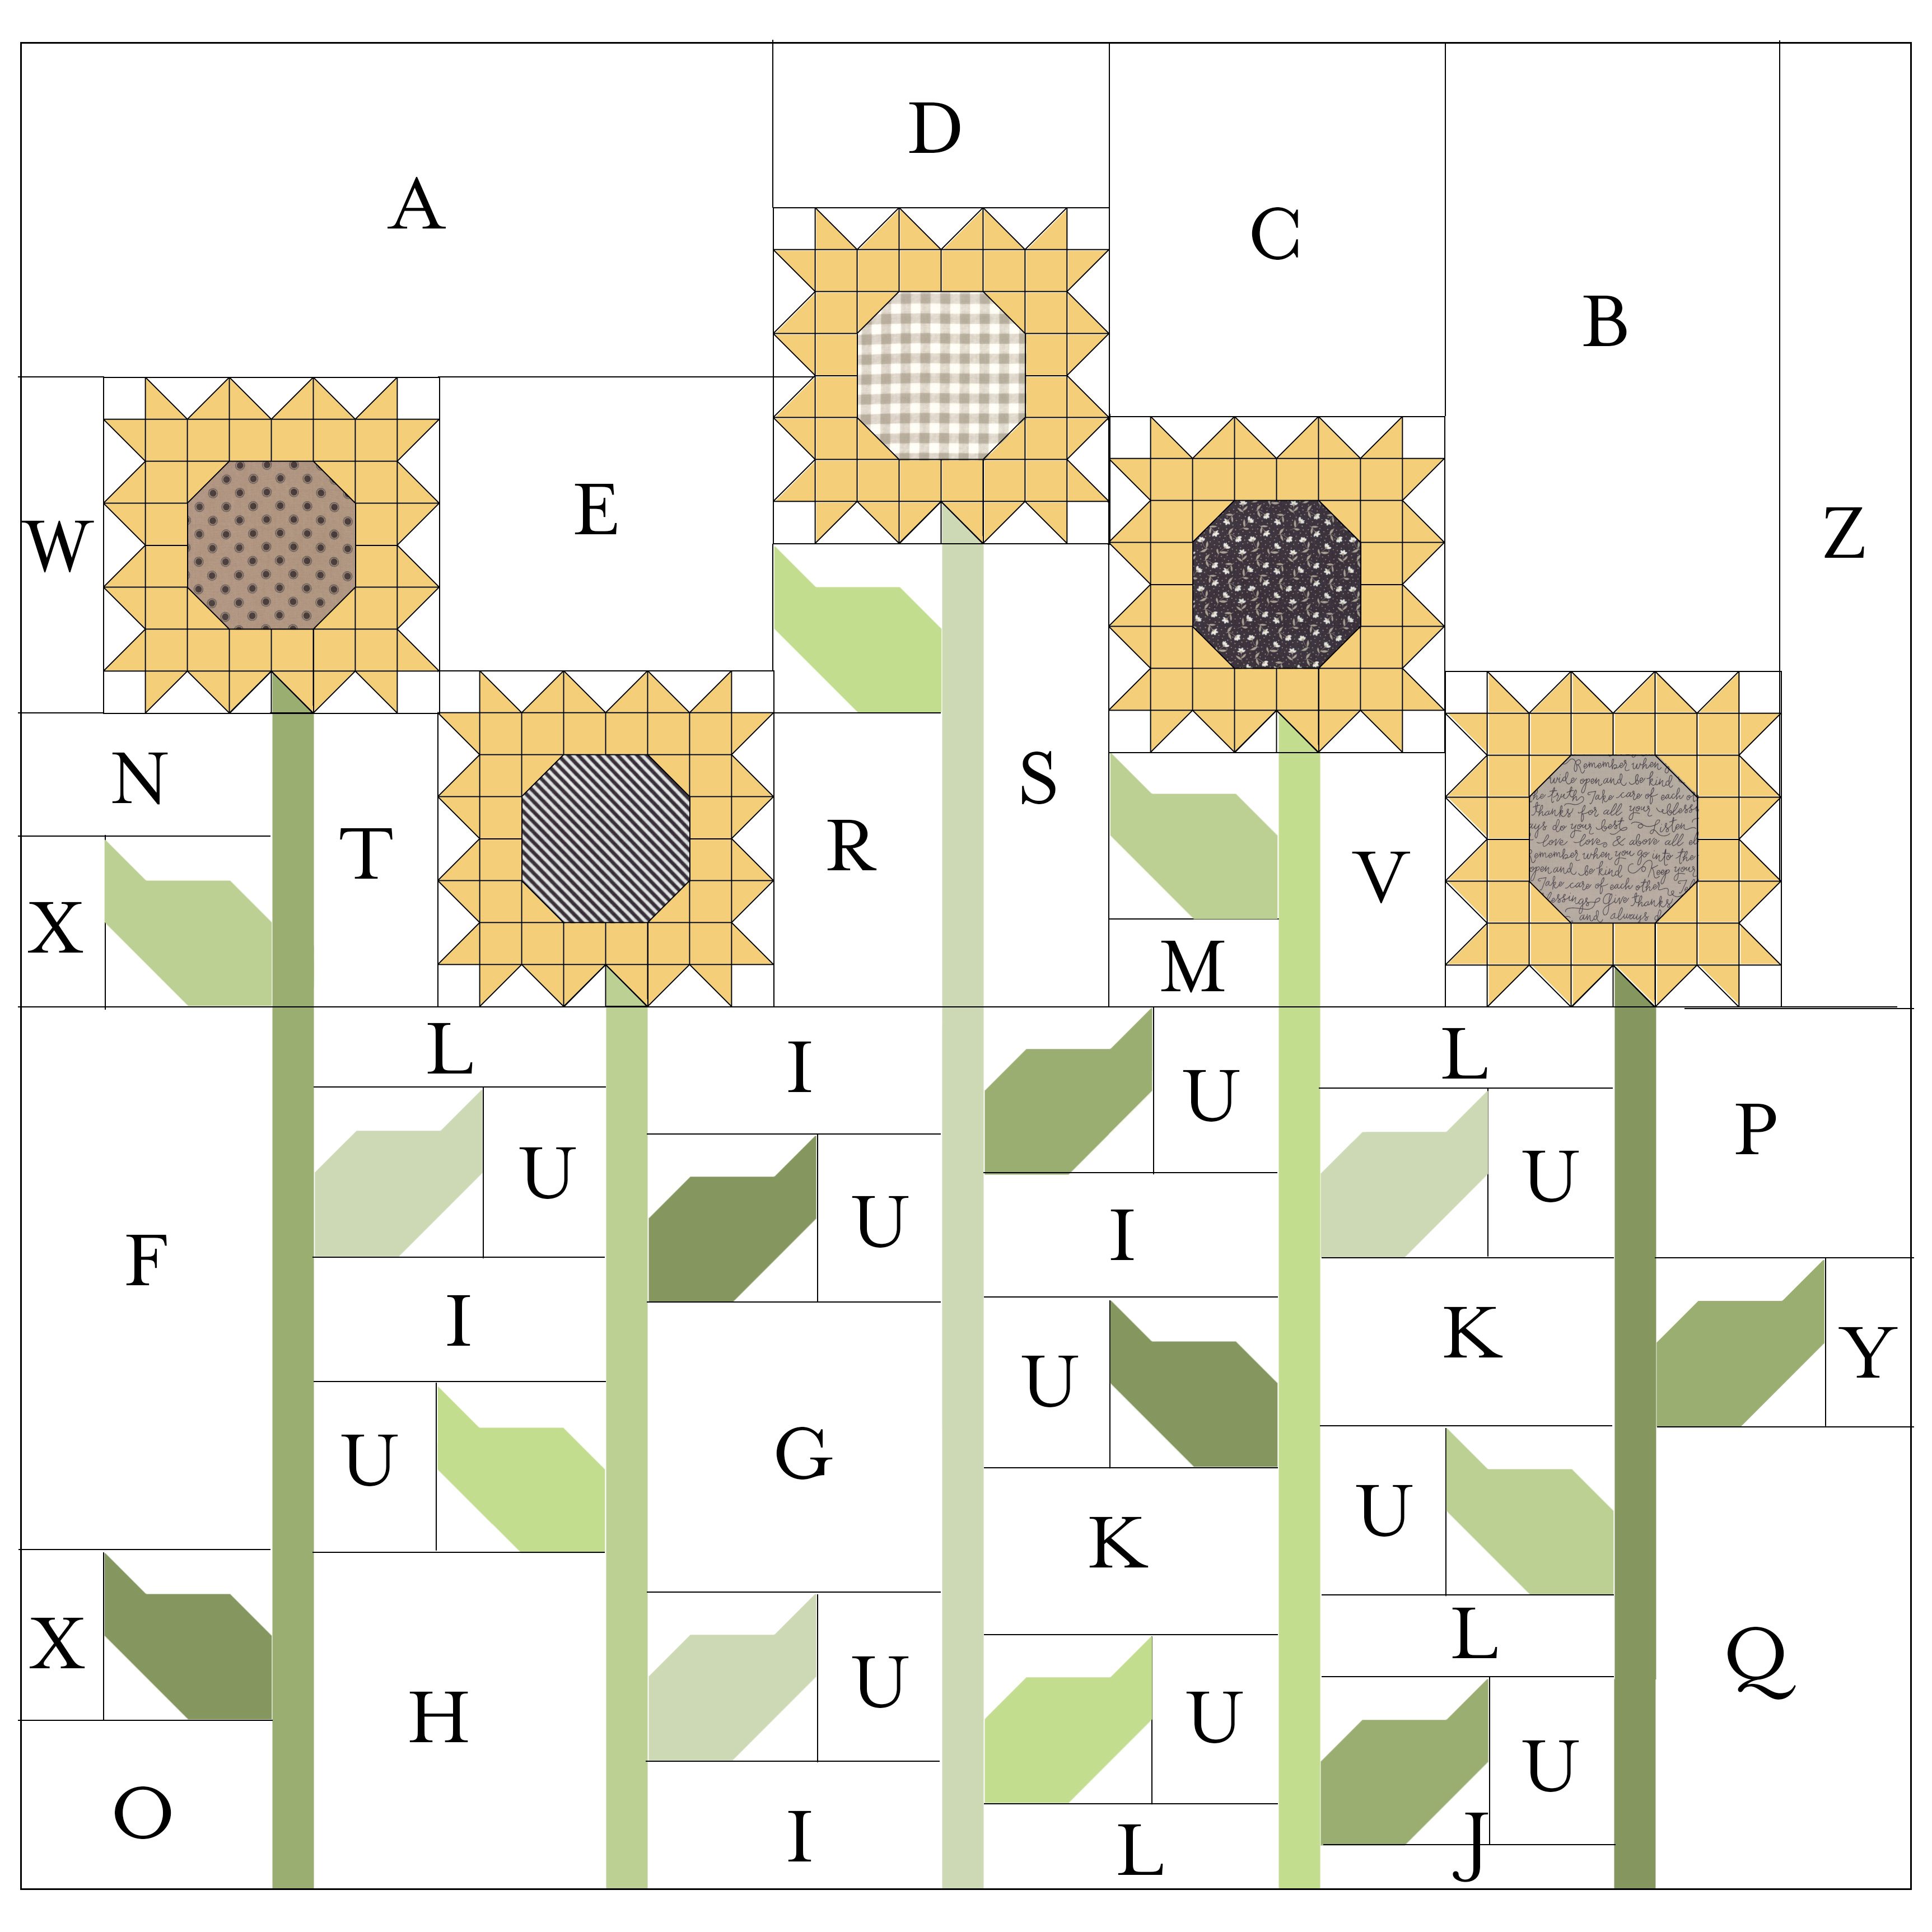
NOTE: The cutting instructions are written to accommodate a unidirectional background print IF it runs parallel with the selvedge (i.e. the original text print used from Farmer’s Daughter). If you want to use a unidirectional print that runs perpendicular to the selvedge (i.e. the text print in Country Rose), here are the cutting modifications below – they have been grouped out of order to minimize waste. (Refer to the pattern for specific unit subcut dimensions. New diagrams included below.)
BACKGROUND FABRIC CUTTING:
– (1) strip 35-1/2″ x 40″. Referring to the diagram, subcut:
- (1) Z rectangle
- (1) A rectangle
- (1) P rectangle
- (1) B rectangle
- (1) C rectangle
- (1) D rectangle
- (1) F rectangle
- (1) J rectangle
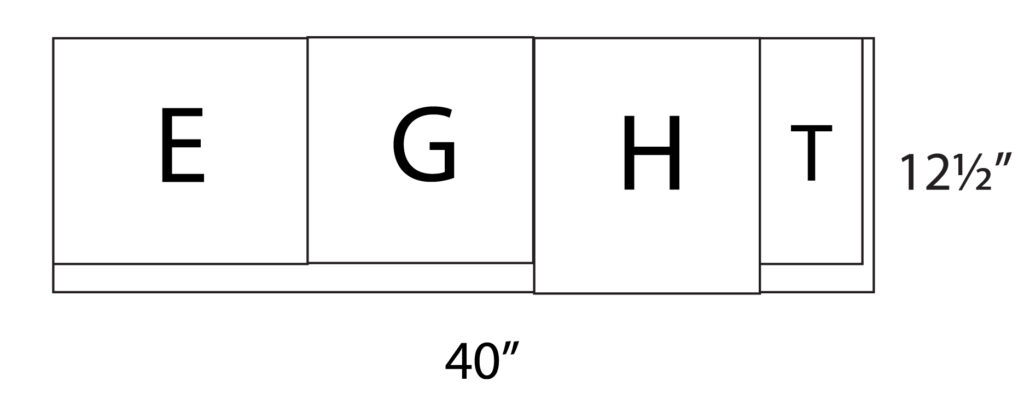
– (1) strip 12-1/2″ x 40″. Referring to the diagram, subcut:
- (1) E rectangle
- (1) G square
- (1) H rectangle
- (1) T rectangle
– (1) strip 5″ x 40″. Referring to the diagram, subcut (3) I rectangles.
– (1) strip 5″ x 40″. Subcut:
- (1) I rectangle
- (1) N rectangle
- (1) L rectangle

– (1) strip 3-1/2″ x 40″. Subcut:
- (3) L rectangles
- (1) M rectangle

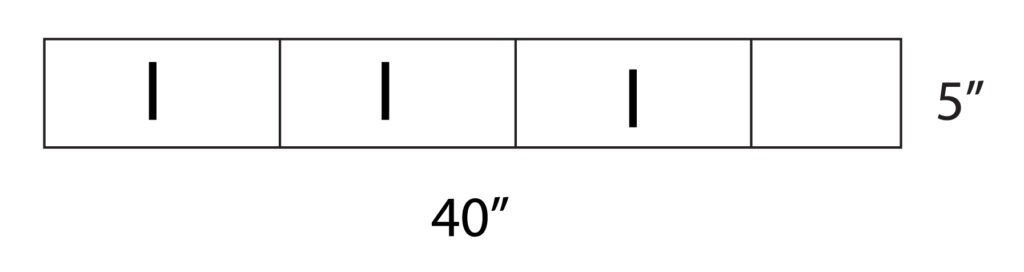
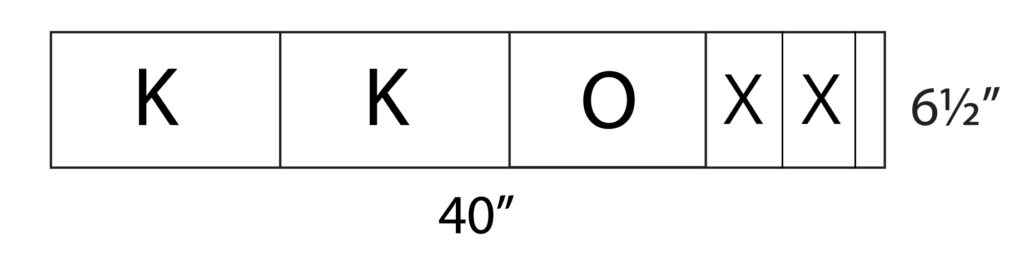
– (1) strip 6-1/2″ x 40″. Subcut:
- (2) K rectangles
- (1) O rectangle
- (2) X rectangles
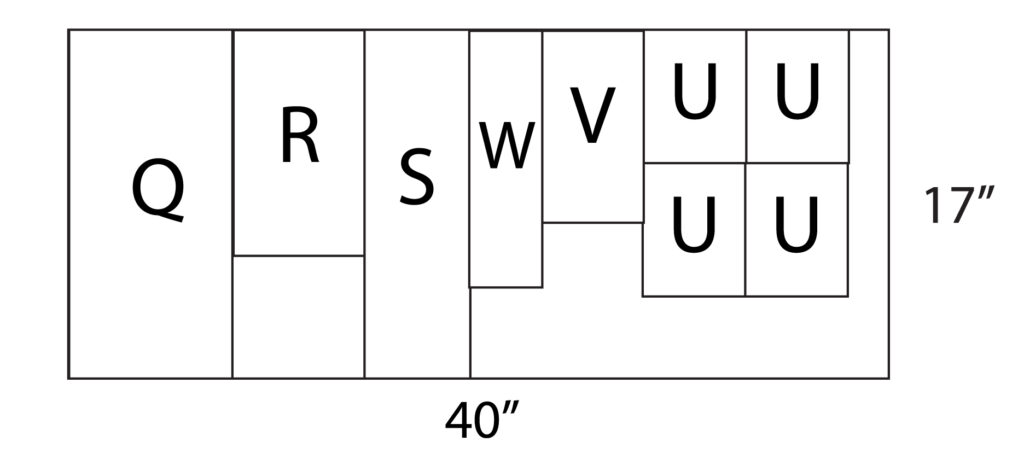
– (1) strip 17″ x 40″. Referring to the diagram, subcut:
- (1) Q rectangle
- (1) R rectangle
- (1) S rectangle
- (1) W rectangle
- (1) V rectangle
- (4) U rectangles
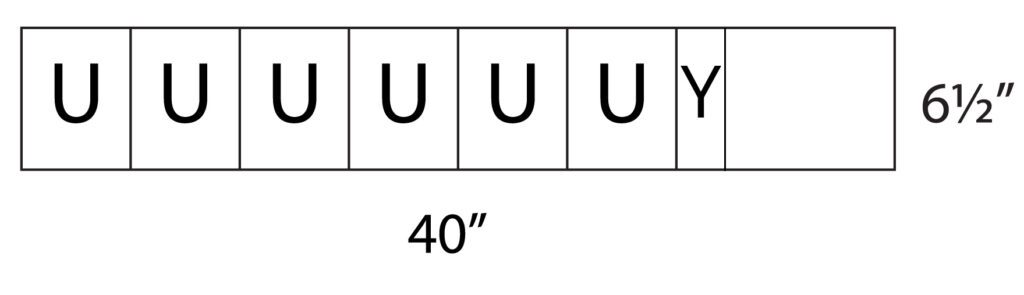
– (1) strip 6-1/2″ x 40″. Subcut:
- (6) U rectangles
- (1) Y rectangle
– (2) strips 3-1/2″ x WOF. Subcut (15) squares 3-1/2″ x 3-1/2″.
– (4) strips 2-1/2″ x WOF. Subcut (60) squares 2-1/2″ x 2-1/2″.
– (3) strips 2″ x WOF. Subcut (15) rectangles 2″ x 6-1/2″.
– (2) strips 2″ x WOF. Subcut (35) squares 2″ x 2″.
LEAF PRINT CUTTING: Because of the required length of the stem units (35″), it is trickier to accommodate unidirectional prints that run perpendicular to the selvedge without a ton of waste… However, this can be done by piecing shorter vertical pieces together. For example – green print #1, you could modify the cutting by cutting the following:
- (5) vertical rectangles 2″ x 7″ instead of (1) horizontal rectangle 2″ x 32″. After you sew the vertical rectangles into a column, trim the excess (approx 1″) to get 2″ x 32.
- (3) vertical rectangles 5″ x 6-1/2″
- (2) vertical rectangles 2″ x 5-3/4″ instead of (1) horizontal rectangle 2″ x 11″. After you sew the vertical rectangles into a column, they will measure 2″ x 11″.
- (1) square 2-1/2″ x 2-1/2″
- (3) squares 2″ x 2″
The cutting modifications you would need to make for the other green prints are very similar. If you need any further assistance, please contact me here.
CORRECTION #2: The assembly diagram on page 7 is missing its outer lines on some of the older printed booklets. It should look like this:
#162 Trinkets
The cutting diagram for the fat quarters did not originally take into account unidirectional prints. (PDFs have been updated 6/11/2021.) The only tweak to accommodate unidirectional prints is to make sure you have 2 vertical + 2 horizontal C rectangles instead of 4 horizontal rectangles. Here’s the adjusted diagram:
It doesn’t mention it in the pattern–but if you’d like to measure the unit in Step #6 (page 3), it should 8-7/8″ x 8-7/8″ unfinished.
#159 Barn Style
No corrections. Patten is written for a 68″ x 68″ lap size–but if you’d like information to make it baby sized (48″ x 48″ finished) or larger (80″ x 80″ finished), visit my blog post here.
#152 Aviator
3/6/17: The pattern was revised with a small tweak in cutting in order to make it easier to get all required pieces per fat quarter. (Some fat quarters aren’t always 22” wide, so this offers a little more leeway.)
The most current version will list:
- A Finished Block size of 16” x 16½”.
- A Finished Quilt size of 64” x 66”.
- Instructions to cut a 7½” x 17½” rectangle under the first bullet of Step #1 in the Cutting section.
If your copy differs, let me know and I’ll email you a current copy.
C’EST LA VIE
(from Fat Quarter Shop’s Sew Sampler Box November 2016).
CORRECTION: On page 3, the instructions for making half-square triangles should say to sew 1/4” away from the marked line on both sides, then cut along the marked line and press open the HSTs. (Don’t sew directly on the marked line.)
#146 Open Heart
FYI: The diagrams for block assembly show a “finished” block. (A “finished block” is what the block will look like once it is sewn into the final quilt top with 1/4″ seam allowance subtracted around the perimeter.) This means that your block assembly won’t match the diagrams exactly, each “unfinished” block will have points 1/4″ in from the raw edge. This is normal and will be taken care of when all the blocks are sewn into the quilt top.
#144 Checkmate
CORRECTION: In Step 9, under “White Fabric” you need (6) squares 5” x 5” per block, (not 9).
#143 June Bug
In Step #12, it should list (2) J squares instead of (1).
#142 Cottage Blossoms
*NOTE: In Step 4 of “Block Assembly,” please note that the white rectangle 6” x 6½” should be oriented so the 6½” sides run along the top/bottom. Since it’s near-square (and not labeled), it could be hard to tell just looking at it.
* Clarification for original copies–ones with a yellow gingham background on the pattern cover:
#133 Shuffle
Step #4 of the cutting instructions for the B triangles contains incorrect wording – your copy may have identical instructions for both A and B triangles which is not right as they should mirror each other… The instructions for the B triangle cutting should read:
“…subcut two triangles by cutting from the bottom-left corner to the top-right corner.”
The diagram is correct.
#124 Sawmill
CORRECTION: Step #1 should say to cut (2) rectangles 4” x 10”.
#126 Cottage Canopy
CORRECTION: Under the “Materials Needed” section, add 1 2/3 yards of scallop trim fabric for the roof