
Sampler Spree Sew Along: My Fabric + Layout Plan
Who’s ready for a summer sew along? Get ready for the Sampler Spree Sew Along using Susan Ache’s new Sampler Spree book. The Sew Along will be hosted by Moda Fabrics + Susan Ache and begins June 16, 2021. That’s coming up soon – now is the perfect time to think about layout + fabric! There are over 100 block designs to choose from in a 6″ finished size. There will be several layout options shared by Susan Ache. (You can get all the official details on Moda’s Cutting Table blog here as well as the Moda Blockheads facebook page here.) I’ve come up with my own plan and block schedule so I’m sharing those details today.
Sampler Spree Sew Along: The Block Patterns
To participate in this sew along, everyone will need a copy of the Sampler Spree book by Susan Ache. (The block patterns will not be shared online for free.) Check with your favorite local or online shop to get a copy of the Sampler Spree book – or if Amazon is your thing, it’s available for purchase in paperback or kindle formats:
The plan for this summer sew along is to sew the blocks in batches – for 10 weeks starting on June 16th. I will be making 3-5 blocks per week instead of the 10 blocks per week the general group will be making. (There are no real rules to this sew along – you get to decide what schedule/block quantity works best for you.)
FABRIC + LAYOUT
Finished blocks: 6″ x 6″
Finished quilt: 84″ x 84″
My plan is to make (33) sampler blocks total in a 6-1/2″ x 6-1/2″ “unfinished” block size. I haven’t decided which specific blocks I’ll make from the book yet, but I hope you’ll follow along for the surprise!
After changing my mind a million times, I’ve decided to use a mix of BasicGrey’s gorgeous Cider and Persimmon fabric collections – yardage that I’ve been hoarding and dying to use.
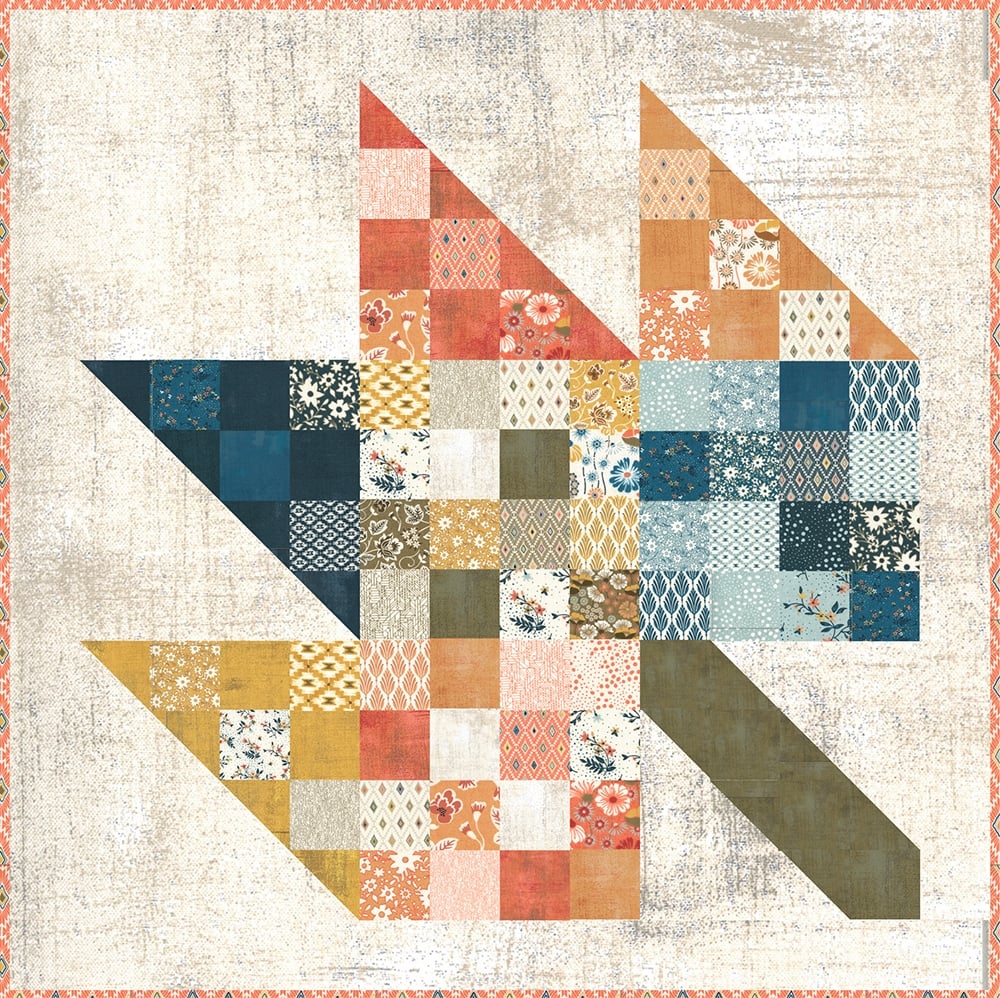
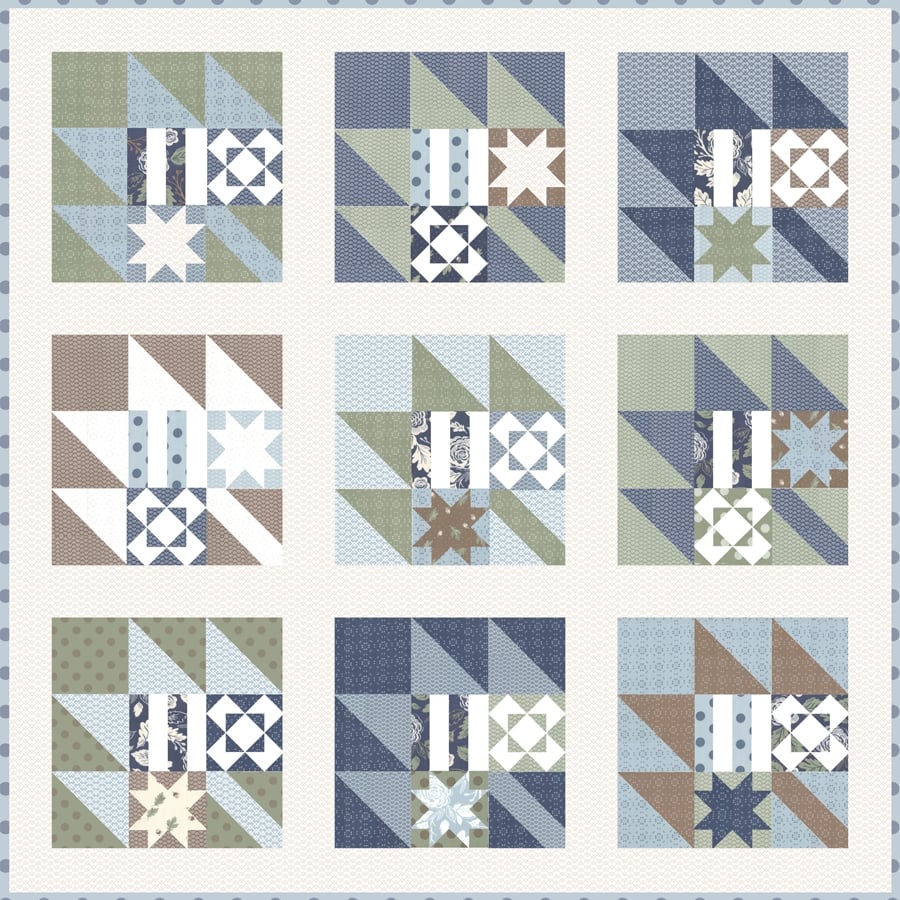
My layout is a giant leaf block – fall-themed and super simple! I’ve included a general mockup below to give you an idea of color placement. (You have to imagine the sampler blocks plugged in.) Some sampler blocks will be plugged into the leaf-point triangle sections. (The placement is purposely sporadic.) The rest of the sampler blocks will be alternation with 6-1/2″ x 6-1/2″ assorted print squares. Talk about a scrappy delight!
How much fabric to buy for this project? Good question. It’s not always clear with a sampler project. The general recommendation for any sampler quilt is a fat quarter bundle. Personally, I tend to use a lot of near-solids in sampler blocks so I get a little extra of those (plus any favorites) before I get started. Here’s the best list I could come up with to duplicate this quilt:
MATERIALS LIST
- 1 fat quarter bundle (or 33 sampler blocks each measuring 6-1/2″ x 6-1/2″ “unfinished”)
- (37) assorted squares 6-1/2″ x 6-1/2″ to mix in with the sampler blocks (can be cut from the fat quarter remnants)
- 3-3/4 yards background fabric (I’m using Grunge #30150-91 “Vanilla”). NOTE: If you’d like a contrasting border print, you will only need 2-1/4 yards of background fabric + 1-1/2 yards border print.
- (4) 1/2-yard cuts of assorted accent prints for the “leaf point” blocks (I’m using Grunges: #30150-545 “Mulled Cider” + #30150-543 “Cobbler” + #30150-544 “Pumpkin Cookies” + #30150-549 “Marionberry Pie”) ***NOTE*** You could possibly get by with a fat quarter 18″ x 22″ or 1/4 yard 9″ x 44″ of each accent print if you cut carefully and use every inch… you would need a minimum of 20″ of usable width per fat quarter or 40″ usable width per 1/4 yard.
- 1/2 yard for the stem print (I’m using Grunge #30150-546 “Golden Delicious”)
- 3/4 yard binding fabric (#30643-13)
- 7 yards backing fabric (undecided)
- 92″ x 92″ batting
CUTTING
- To the background fabric, cut the following:
- (1) strip 25″ x WOF. Subcut (1) square 24-1/2″ x 24-1/2″ and (2) squares 12-1/2″ x 12-1/2″
- (1) strip 12-1/2″ x WOF. Subcut (4) rectangles 6-1/2″ x 12-1/2″
- (2) strips 7″ x WOF. Subcut (8) squares 7″ x 7″ and (2) squares 6-1/2″ x 6-1/2″.
- (2) strips 6-1/2″ x WOF. Subcut (10) squares 6-1/2″ x 6-1/2″ (add to others for a total of 12).
- (2) strips 6-1/2″ x WOF. Subcut (4) rectangles 6-1/2″ x 18-1/2″.
FOR THE BORDER, cut the following from background fabric – OR – 1-1/2 yards of a border print:
- (8) strips 6-1/2″ x WOF. Sew (2) strips end-to-end to get (1) new strip measuring approx. 6-1/2″ x 80″. Make (4).
2. To each accent print: Cut (2) squares 7″ x 7″ and (4) squares 6-1/2″ x 6-1/2″.
3. To the stem print, cut (2) squares 12-1/2″ x 12-1/2″ and (2) squares 6-1/2″ x 6-1/2″.
4. To the binding fabric, cut (9) strips 2-1/2″ x WOF.
ASSEMBLY:
5. Mark a diagonal line on the back of (8) background squares 7″ x 7″. Bring (1) marked background square RST with (1) accent square 7″ x 7″. Sew 1/4″ away from the marked line on both sides. Cut along the marked line, and press each half-square triangle (HST) block flat. Trim each HST to 6-1/2″ x 6-1/2″. Make (4) HSTs per accent color.

6. To make each leaf triangle section, gather the following:
- (4) HSTs from Step #5 in accent color #1
- (3-4) squares 6-1/2″ x 6-1/2″ in accent color #1
- (1) background square 6-1/2″ x 6-1/2″
- (1) background rectangle 6-1/2″ x 12-1/2″
- (1) background rectangle 6-1/2″ x 18-1/2″
- (2-3) sampler blocks 6-1/2″ x 6-1/2″ (marked with an ‘X’)
Arrange the units into rows as shown. (Obviously, this is just one example and each leaf triangle in my mockup varies from one to the next. Feel free to take liberties here.)
Once everything is arranged as desired, sew the units into rows. Press the seams – I recommend alternating the pressing direction from row to row. Sew the rows together and press. “Unfinished” block section should measure 24-1/2″ x 24-1/2″.

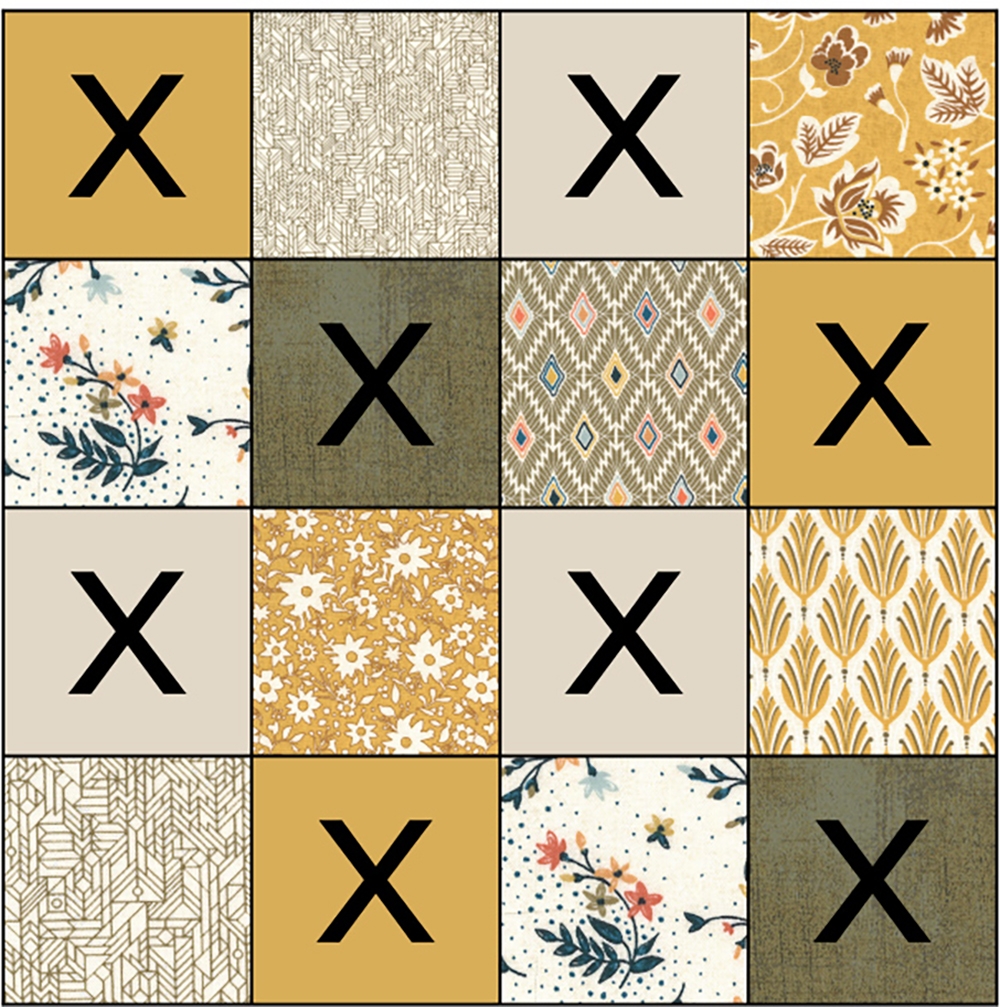
7. To make each scrappy square section, gather the following:
- (8) assorted prints 6-1/2″ x 6-1/2″
- (8) assorted sampler squares 6-1/2″ x 6-1/2″ (marked with an ‘X’)
Arrange the units into (4) rows of (4), alternating the print squares and sampler blocks. Once everything is arranged as desired, sew the units into rows. Press the seams – again, I recommend alternating the pressing direction from row to row. Sew the rows together and press. “Unfinished” block section should measure 24-1/2″ x 24-1/2″.
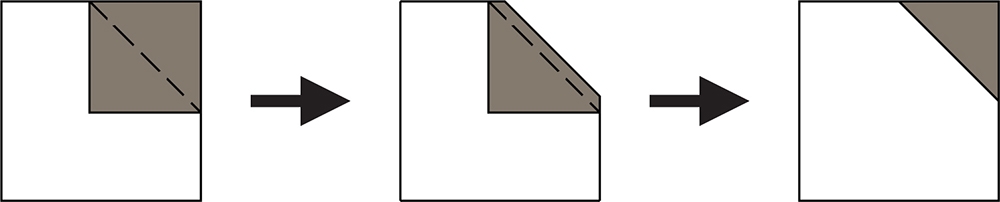
8. Mark a diagonal line on the back of (4) background squares 6-1/2″ x 6-1/2″. Bring (2) marked background squares RST with (1) stem square 12-1/2″ 12-1/2″, aligning the squares in opposite corners, orienting the marked lines as shown. Sew along the marked lines, trim 1/4″ seam allowance, and press. Unfinished block should measure 12-1/2″ x 12-1/2″. Make (2).
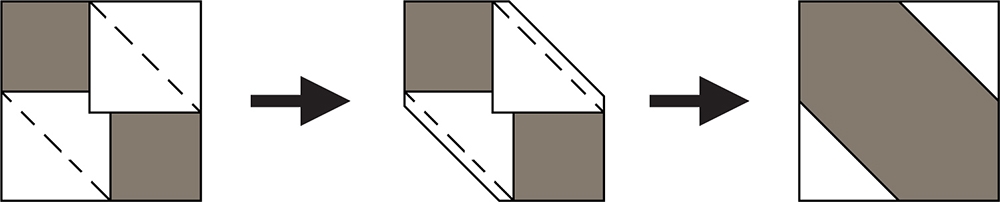
9. Mark a diagonal line on the back of (2) stem squares 6-1/2″ x 6-1/2″. Bring (1) marked stem square RST with (1) background square 12-1/2″ x 12-1/2″, orienting the marked line as shown. Sew along the marked line, trim 1/4″ seam allowance, and press. Unfinished block should measure 12-1/2″ x 12-1/2″. Make (2).
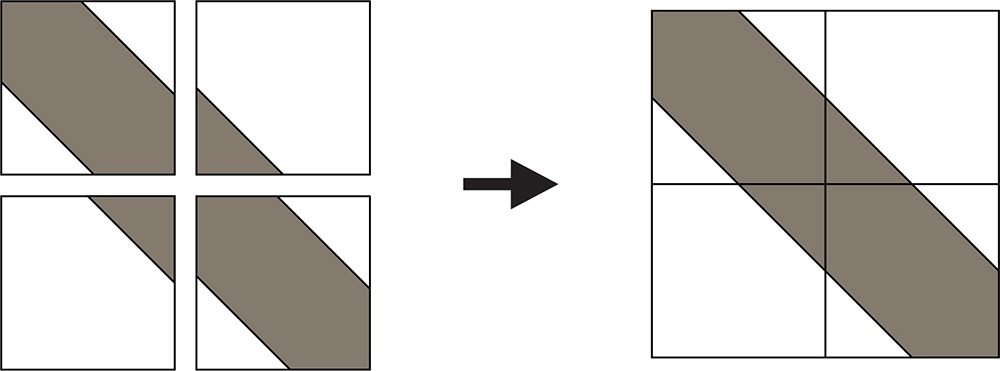
10. Arrange and sew into rows: (2) units from Step #8 and (2) units from Step #9. NOTE: The seams won’t line up until after sewing them together with the 1/4″ seam allowance (don’t try to align them at the raw edges). If they don’t quite line up exactly, play around with pressing direction or pick out the stitches and tweak as needed. “Unfinished” unit should measure 24-1/2″ x 24-1/2″.
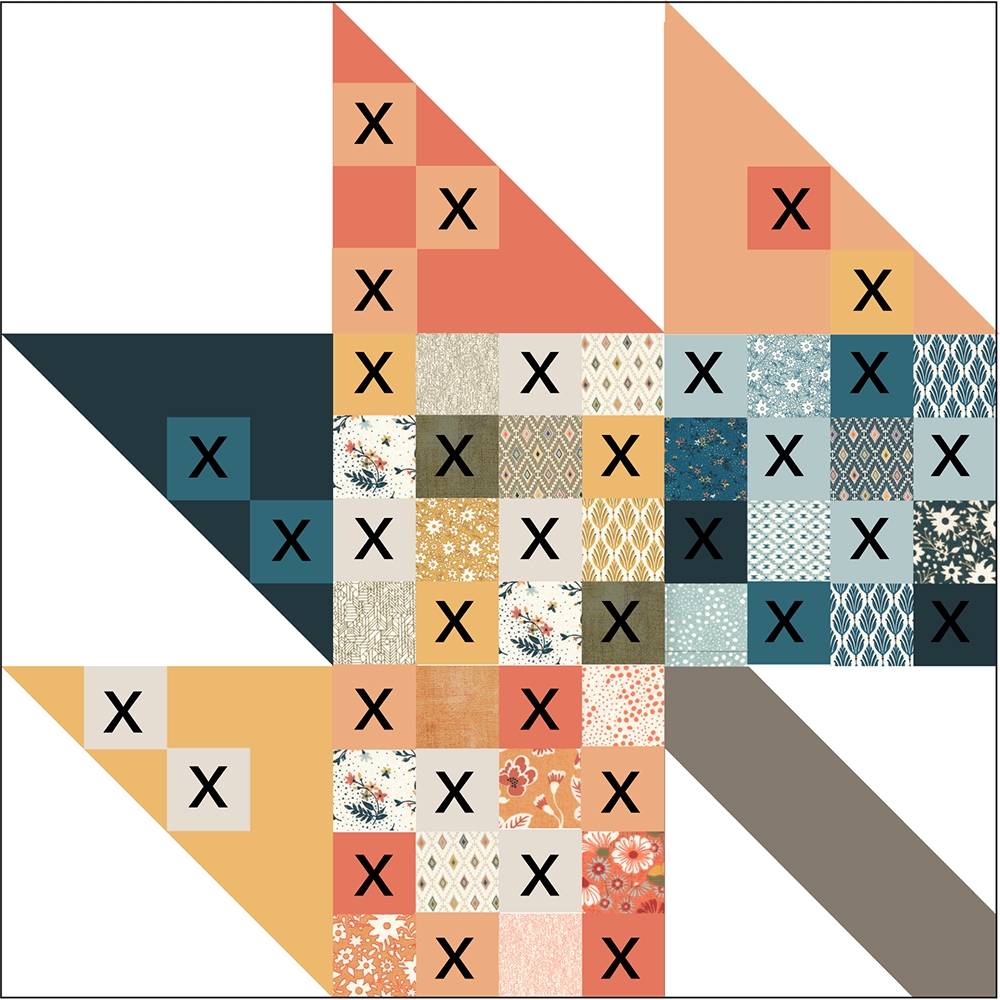
11. Arrange and sew the following into rows (I’ve marked an ‘X’ everywhere I placed a sampler block):
- (1) background square 24-1/2″ x 24-1/2″
- (4) leaf triangle sections from Step #6
- (3) scrappy square sections from Step #7
- (1) stem unit from Step #10
Press the rows, alternating the pressing direction from row to row. Sew the rows together and press.
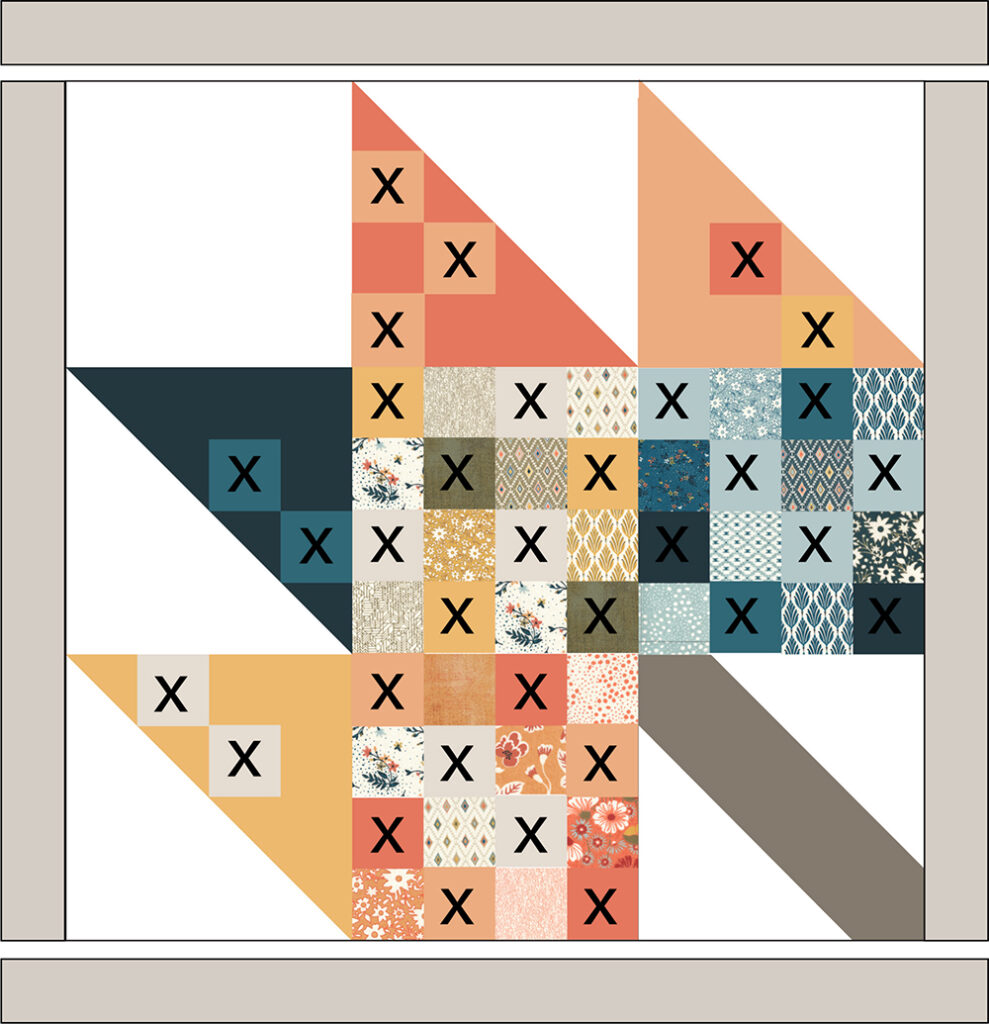
UPDATE: Now that I’ve assembled my top – here is a picture of what this actually looks like:

12. The final step is to add a border. The best way to do this is to first measure the quilt top length in multiple places to calculate the average length. Once you figure out what that is, trim (2) pieced border strips to match that average length (should be approx. 72-1/2″). Save those trimmings momentarily – you will need them in a moment! Sew the trimmed border strips to the left and right sides of the quilt. Press.
Measure the (new) width of the quilt top in multiple places to calculate the average width. Once you figure out what that is, trim (2) pieced border strips to match that average width (should be approx. 84-1/2″). NOTE: This is where those border trimmings may come in handy. If the WOF (width of fabric) of your border strips is only 40″ wide (average is 40-44″), sew the trimmings onto the ends of the remaining pieced border strips so they will be long enough to trim down to the average width. Sew the trimmed border strips to the top and bottom of the quilt top. Voila!
13. Quilt, baste, and bind using preferred methods.
Other Layout Ideas
If you like the idea of a fall leaf quilt, you could also plug (27) 6″ sampler blocks into my New Leaf layout:
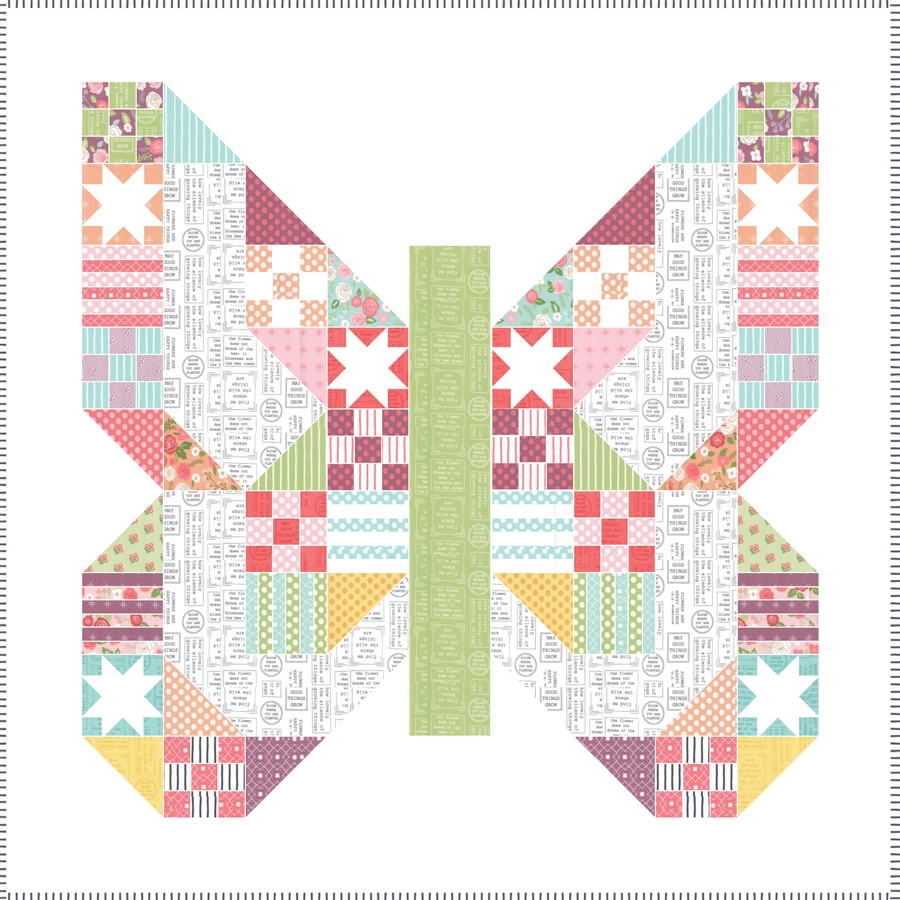
Or you could plug (26) 6″ sampler blocks into my Butterfly Patch quilt layout:
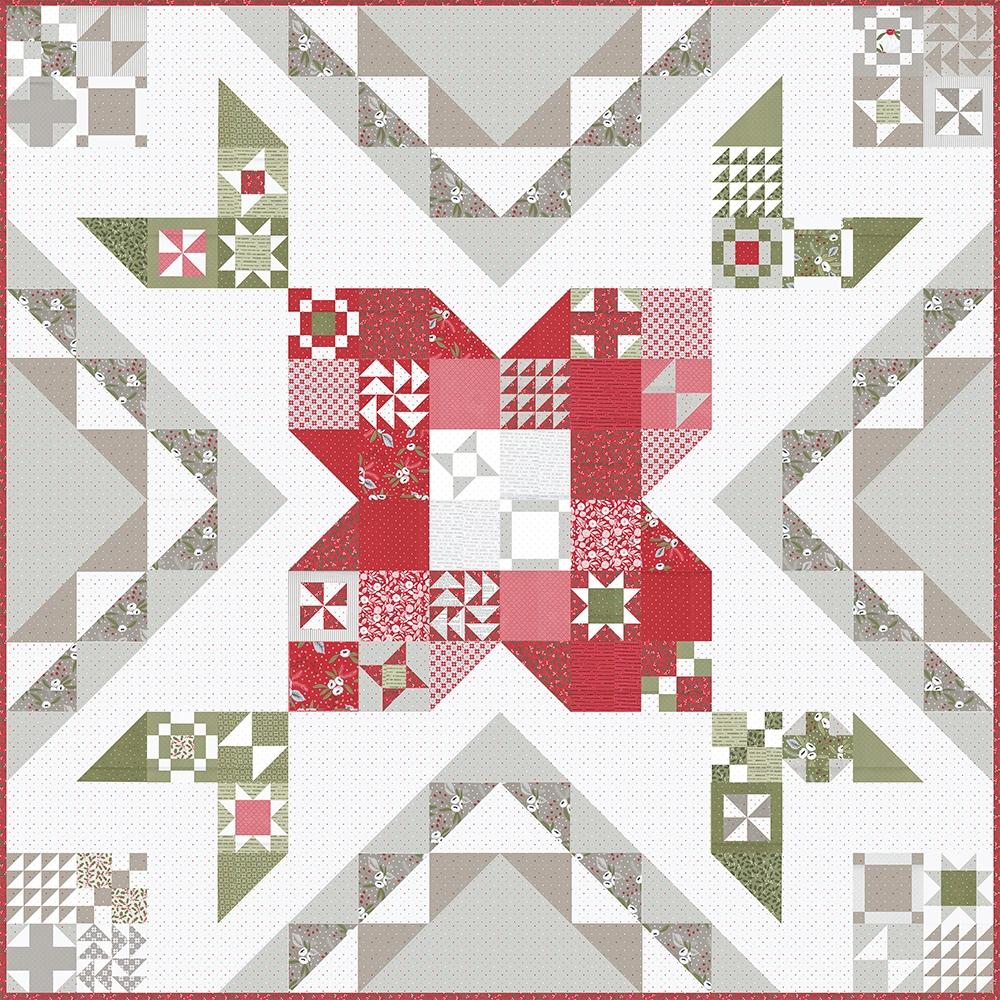
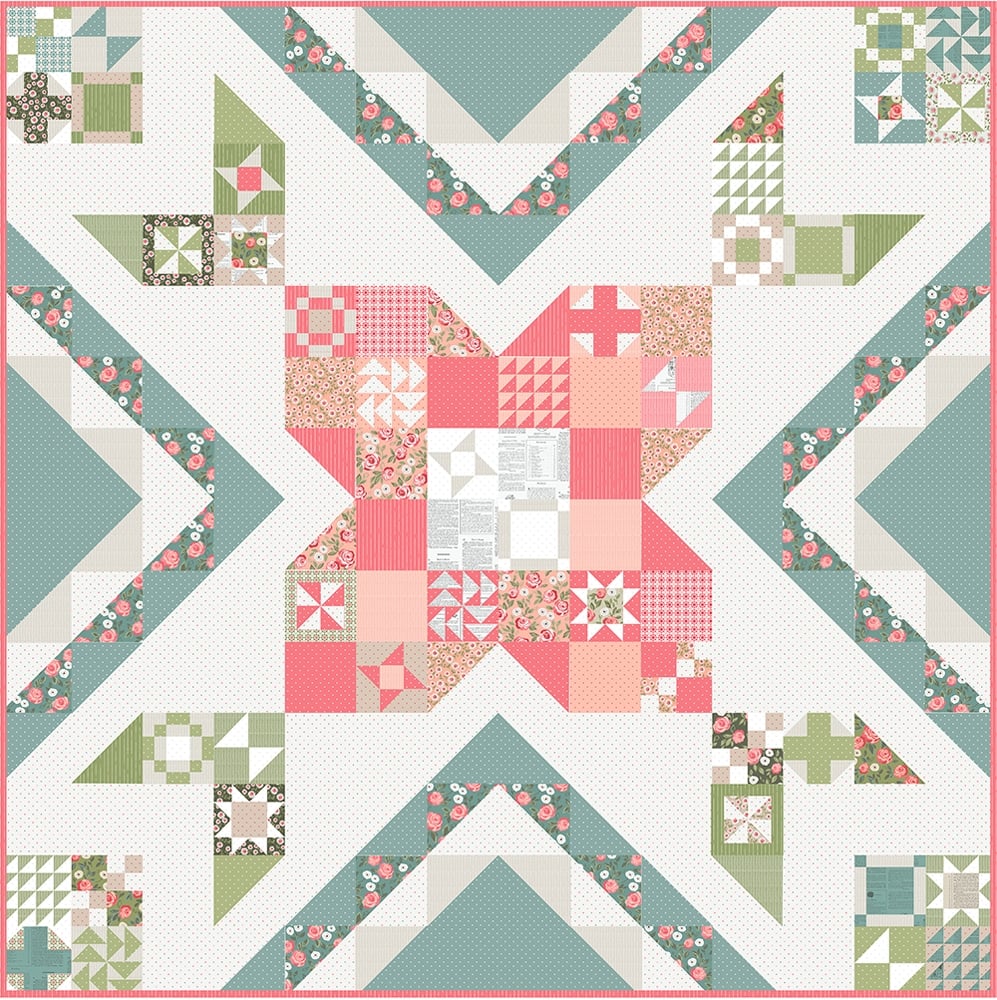
There are other layout ideas I’ve used in the past for samplers. You may like my Rose in Bloom quilt layout – it’s perfect for (40) 6″ sampler blocks. I’ve used the Rose in Bloom layout twice – here’s the Christmas mockup I’ve used for my Sewcialites quilt:
And here is the original Rose in Bloom block of the month mockup in Love Note fabric:
Of course, you can always come up with your own layout or use many of the ideas that Susan Ache has come up with (and will be sharing throughout the sew along). There are so many options out there, find something that speaks to you!
Which of these sampler spree sew along fabrics and layouts do you like the most? Let me know in a comment below!
Like this post? Drop your email in the box below to get new post notifications via email.
Leave a Reply
You must be logged in to post a comment.
14 Comments
Marcy H
June 7, 2021 at 6:51 amI LOVE your leaf layout & might just have to use as you have it with a Cider layer cake! I love this fabric & am currently finishing up a baby quilt with it for my future grandbaby. I don’t have time for another sew along right now but am thinking this would be wonderful for fall!
Linda P
June 7, 2021 at 7:25 amYou have my heading buzzing! Love your leaf layout & after summer SAL it would be perfect for autumn and make you want yo finish it up!! Love the rose layout as well.
Alycia
June 7, 2021 at 7:52 amI love your layout! A fall quilt is a great goal!
Teresa C
June 7, 2021 at 8:24 amSuch a lovely layout. – perfect for the Cider collection!
Monica Sayre
June 7, 2021 at 9:05 amWhat a great idea to use these blocks with christmas fabrics in the shape of a snowflake ‐ Love it!
Carol Paine
June 7, 2021 at 9:15 amSew love sampler quilts.
Dawn Downey
June 7, 2021 at 9:25 amLove your fall leaf layout and I have a fqb of Cider I haven’t had the nerve to cut into but I think this just might be the project to get my rotary cutter moving!
Tonyamarie Klapperich
June 7, 2021 at 10:09 amBeautiful colors and fun layouts! I really lime the christmas mock up pattern in both color ways.
Char
June 7, 2021 at 10:37 amCan you please make this info into a PDF ?
Carol M
June 16, 2021 at 11:47 amOoh. I’ve been meaning to make the New Leaf pattern for a while…this is another idea to think about!
Karen rose
June 7, 2021 at 10:52 amYikes I didn’t realize 10 blocks a week!!! Not for me but I like your plan. Do you think I could pull off the leaf without doing fall colors? Maybe spring leaves!!
Donna
June 7, 2021 at 11:08 amThis is a keeper. I am starting with a kit from an on-line event which never was made. It has fabric for 12 inch blocks so I have plenty of fabric for 24 plus blocks to start.
Joan Smith
July 21, 2021 at 7:18 amI really like all of your layouts but the butterfly is my favorite.
Inscrivez-vous pour obtenir 100 USDT
August 8, 2024 at 1:57 amThanks for sharing. I read many of your blog posts, cool, your blog is very good.