
Christmas Pillows in Christmas Eve Fabric
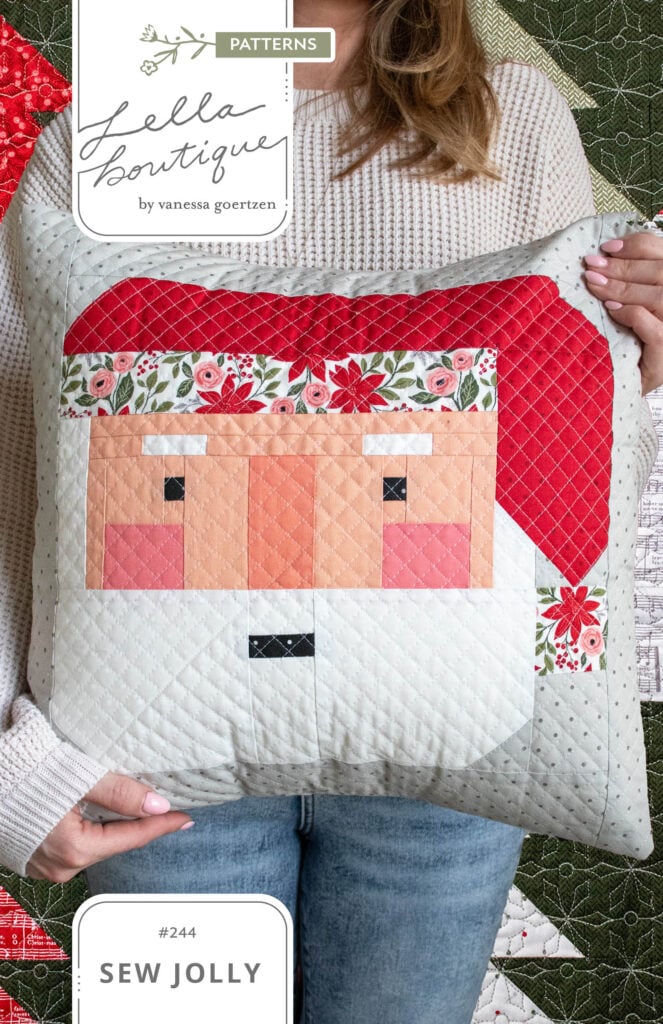
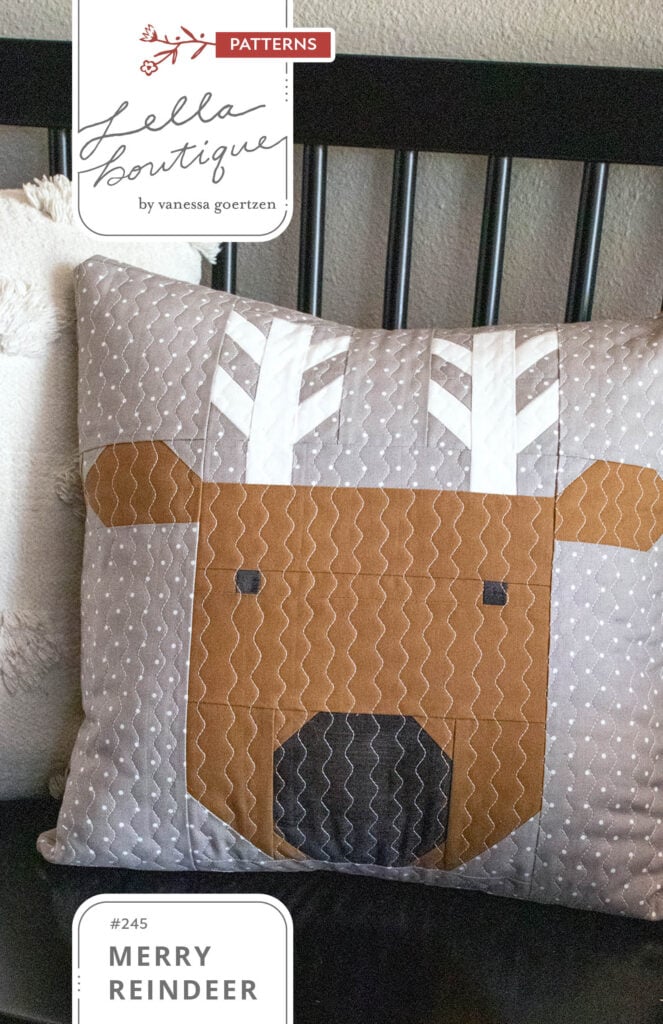
Get ready for the cutest batch of Christmas pillows you’ve ever seen… as an update to this post, I’ve finally added individual pillow patterns to the shop for the Santa and reindeer called “Sew Jolly” Santa pillow pattern and “Merry Reindeer”. Not only do they include full instructions to make the patchwork pillow, but I’ve also inserted a few details about adding a Chenille-It embellishment for some added fluffy texture. (See more about that in a post here.)
For the purposes of this post, we’re going to get into adapting the existing Christmas Eve quilt patterns into 18″ Christmas pillows. To get started, you will need a Christmas Eve pattern bundle (or whatever quilt pattern you want to use for a pillow top).
Make the Quilt Blocks
Let’s get started! For this tutorial, I’m highlighting a few blocks from the Christmas Eve pattern collection:
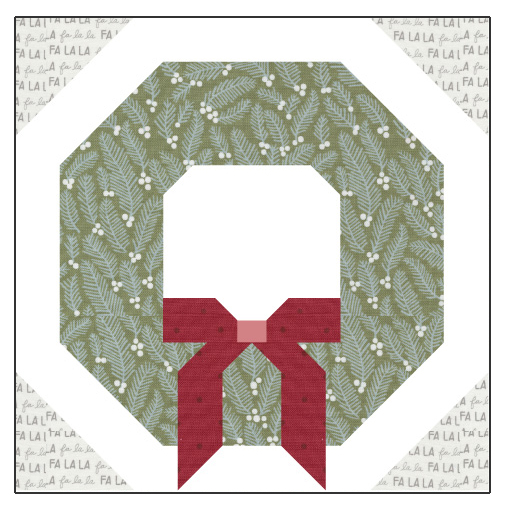
- The wreath from #213 “Good Tidings”
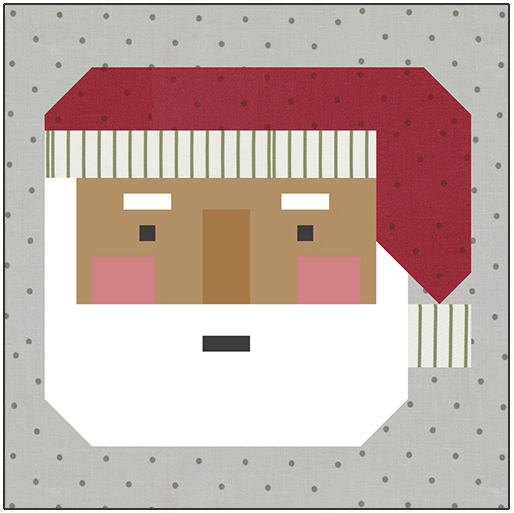
- The Santa from #214 “Jolly Holiday” – OR – #218 “St. Nick”
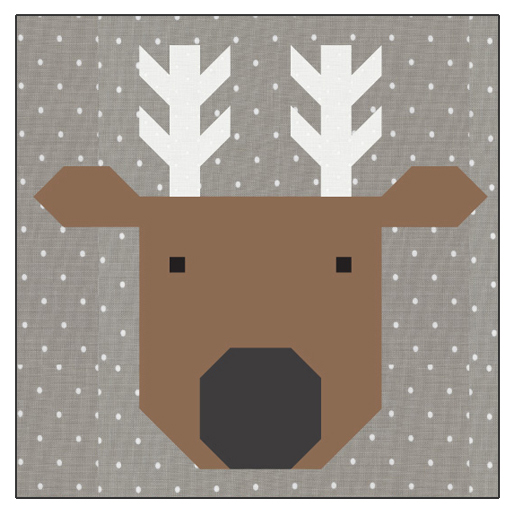
- The reindeer from #217 “Reindeer Xing”
Of course, you can use any quilt block you’d like! No matter what you choose, we must adjust the block to get an “unfinished” block size of 18″ x 18″.
SINGLE BLOCK MATERIAL LISTS
Because we’re only making a single block from these specific quilt patterns, I’ve created modified materials lists for one block of each pattern. Feel free to share this information with your favorite local / online shop to help you get a kit together for any of these pillows. (Don’t forget to add “Finishing Materials” for each pillow you make.)
THE WREATH BLOCK:
To make (1) Good Tidings wreath block like mine in Christmas Eve fabric, you will need:
- (1) fat quarter wreath print (CE #5182 15)
- (1) fat eighth red bow print (CE #5187 16)
- (1) square 5″ x 5″ pink bow center print (Bella Solid #9900 425 “Rose Water”)
- (1) fat quarter white background print (CE #5187 21) (cutting diagram below, refer to pattern for specific unit sizes)
- OPTIONAL: (1) fat eighth corner triangle accent print (CE #5184 11)
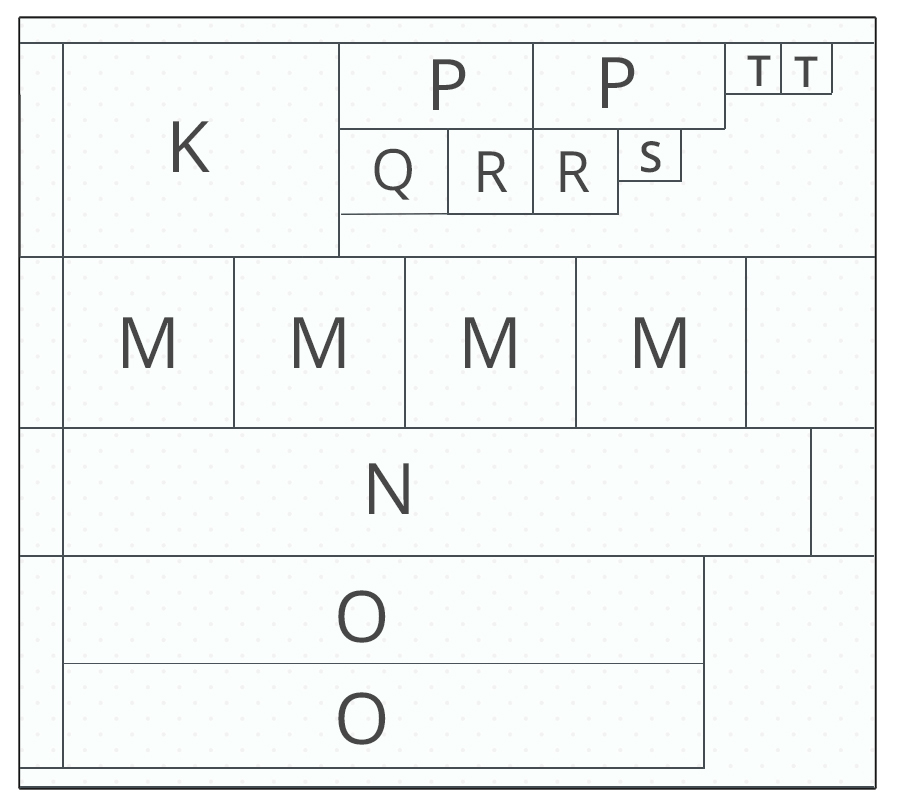
INSTRUCTIONS: Make (1) wreath block according to the “Good Tidings” pattern instructions. (Start with Step #12 for the cutting list / instructions to make a single wreath block.) I chose to omit the “J” corner accent triangles but you could totally keep them if you want.) To increase this block to the desired unfinished size of 17-1/2″ x 17-1/2″, tweak the cutting for the “N” and “O” units:
- (1) “N” rectangle 3-1/2″ x 18″
- (2) “O” rectangles 2-3/4″ x 15″
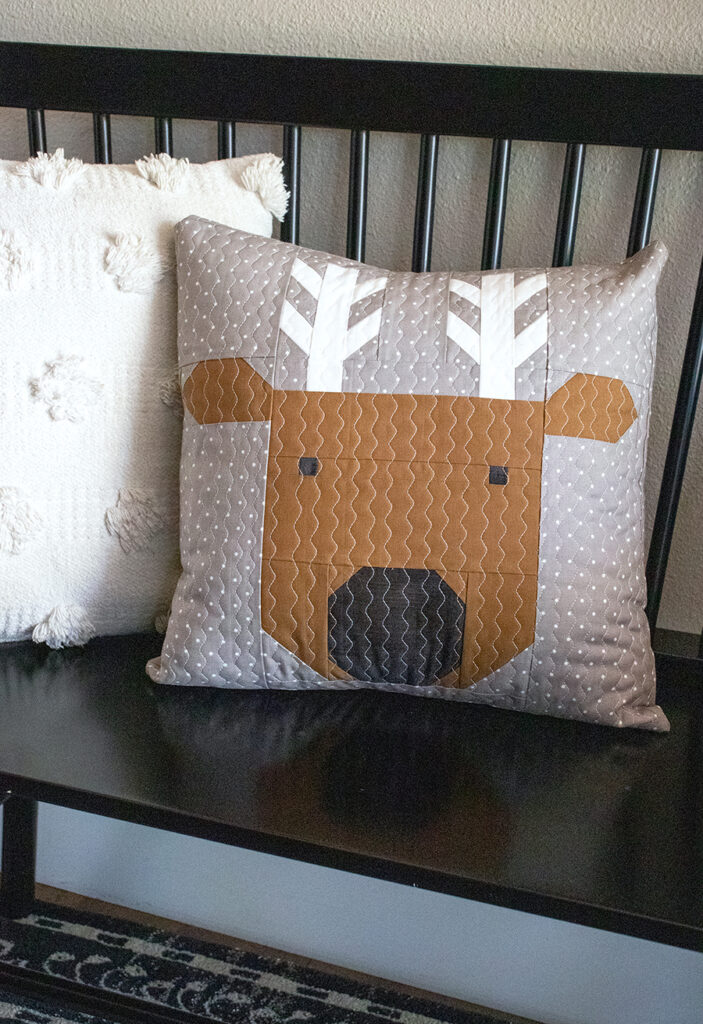
THE REINDEER BLOCK
To make (1) Reindeer Xing reindeer block like mine in Christmas Eve fabric, you will need:
- 1/2 yard dark grey dot fabric (CE #5187 13)
- (1) fat eighth brown fabric (Bella Solid #9900 194 “Sienna”)
- (1) square 8″ x 8″ chacoal fabric (Bella Solid #9900 284 “Charcoal”)
- (1) fat eighth white antler print (CE #5187 21)
INSTRUCTIONS: Make (1) reindeer block according to the “Reindeer Xing” pattern instructions. (Start with Step #10 for the cutting list / instructions to make a single reindeer block. To increase the block to the desired unfinished size of 17-1/2″ x 17-1/2″, cut these additional border pieces:
- (2) rectangles 1-1/4″ x 16-1/2″ of background fabric (add to left / right sides of the block first)
- (2) rectangles 1-1/4″ x 18″ of background fabric (add to the top / bottom of the block last)
THE SANTA BLOCK
To make (1) Jolly Holiday / St. Nick Santa quilt block like mine in Christmas Eve fabric, you will need:
- (1) fat eighth face fabric (Bella Solid #9900 68 “Fig Tree Wheat”)
- (1) square 5″ x 5″ nose fabric (Bella Solid #9900 104 “Hay”)
- (1) square 6″ x 6″ cheek fabric (Bella Solid #9900 425 “Rose Water”)
- (1) fat eighth white beard fabric (CE #5187 21)
- (1) square 5″ x 5″ charcoal fabric (Bella Solid #9900 284 “Charcoal”)
- (1) fat eighth red fabric for hat (CE #5187 16)
- (1) fat quarter light grey background fabric (CE #5187 12)
- (1) fat eighth hat trim fabric (CE #5186 11)
- [OMIT light accent border print]
INSTRUCTIONS: Make (1) Santa block according to either Jolly Holiday / St. Nick pattern instructions:
#214 Jolly Holiday: Omit the “MM” and “NN” rectangles in light accent border fabric. Start with Step #20 for the cutting list / instructions to make a single Santa block. To increase the block to the desired unfinished size of 17-1/2″ x 17-1/2″, tweak the cutting size for the “T” and “W” units:
- (2) “T” rectangles 3-1/4″ x 14″
- (2) “W” rectangles 2-1/2″ x 18″
OR #218 St. Nick: Omit the “EE” and “FF” rectangles in light accent border fabric. Start with Step #15 for the cutting list / instructions to make a single Santa block. To increase the block to the desired unfinished size of 17-1/2″ x 17-1/2″, tweak the cutting size for “T” and “W” units:
- (2) “T” rectangles 3-1/4″ x 14″
- (2) “W” rectangles 2-1/2″ x 18″
Basting & Quilting the Blocks
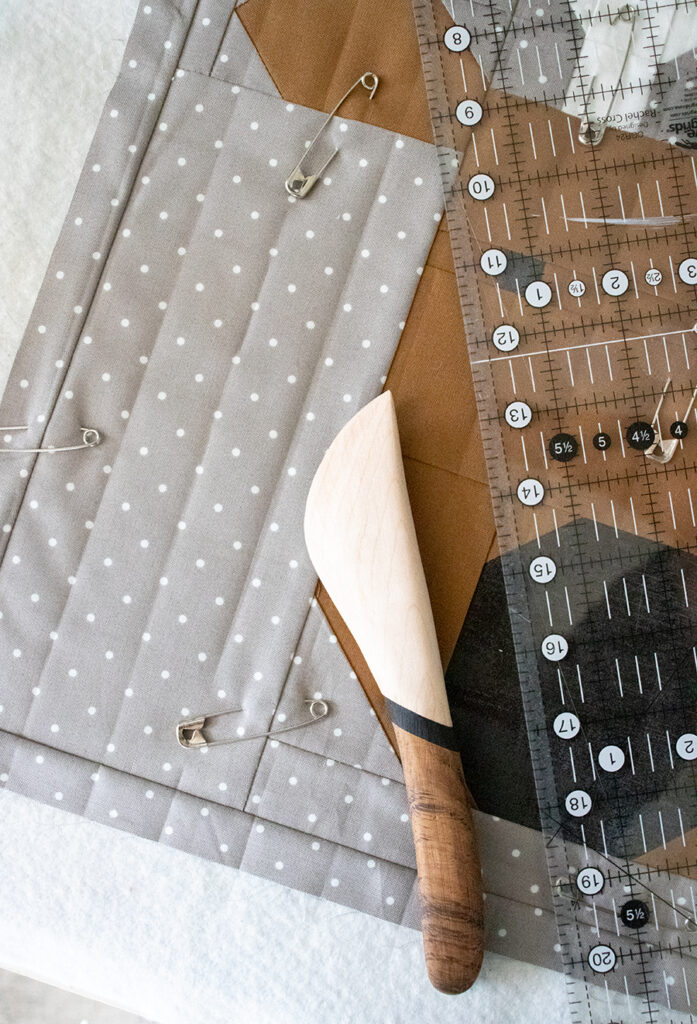
Once the quilt block is pieced, verify that it measures 18″ x 18″. (Make any adjustments, as needed.) The next step is to “baste” it to a batting square. I cut a piece of batting that is at least 1″ larger than the block around the perimeter. From there, use either a sticky basting spray and / or safety pins to secure the block to the batting. (Make sure you smooth out any wrinkles.)
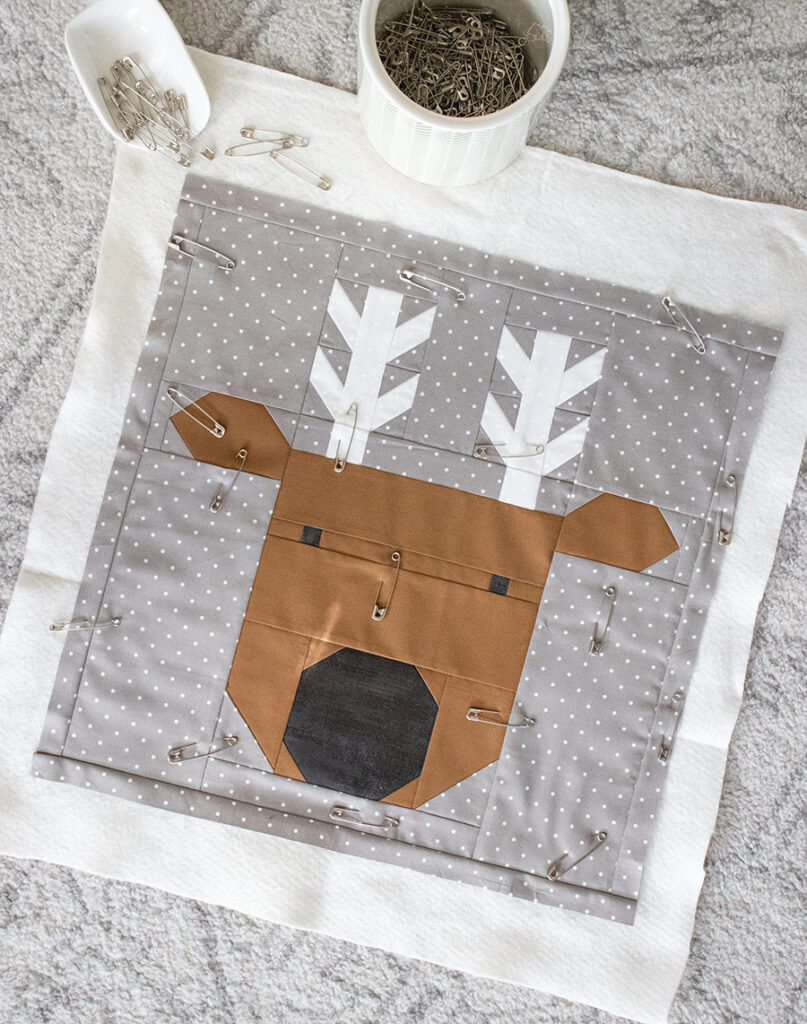
Quilt the block to the batting using your desired method. It can be helpful to mark guides ahead of time. I used a hera marker and ruler to create lines (creases) 1″ apart. You could also use a heat-removable Frixion pen.
After “marking” my lines, I used Bernina stitch #4 (a cool diagonal stitch) with settings at 4.5 stitch width and 2 .0 length. I filled in each space twice by lining up the edge of the foot with the marked lines on both sides.
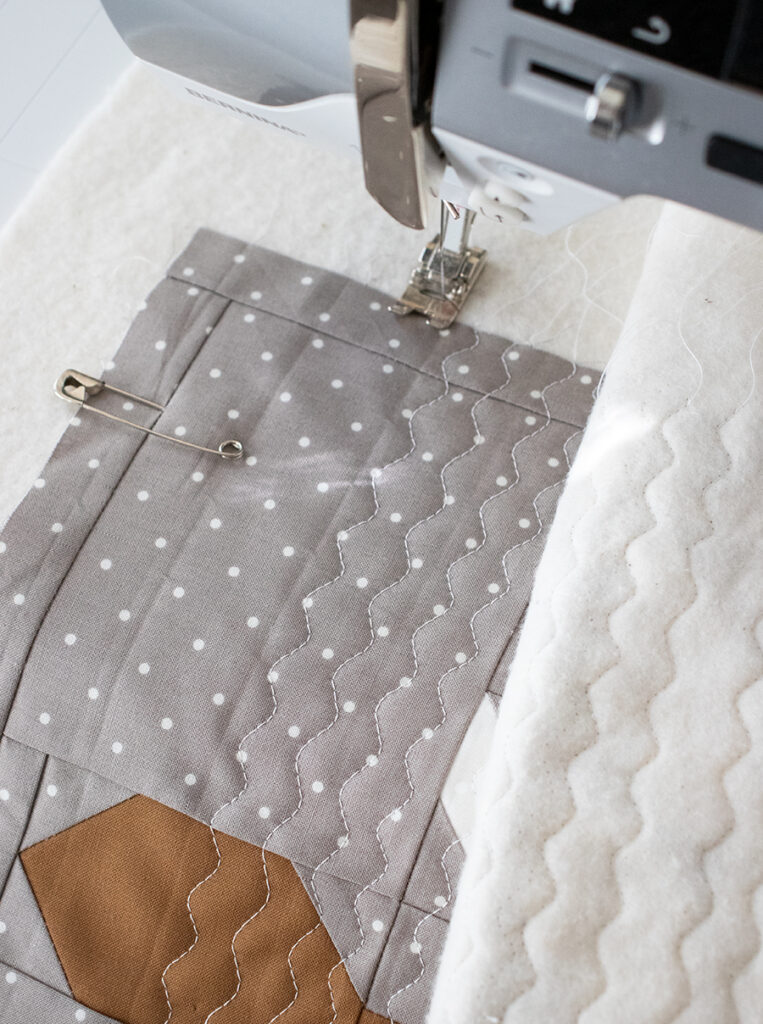
Once the quilting is finished, trim up the quilted block to 18″ x 18″.
More Quilting Ideas
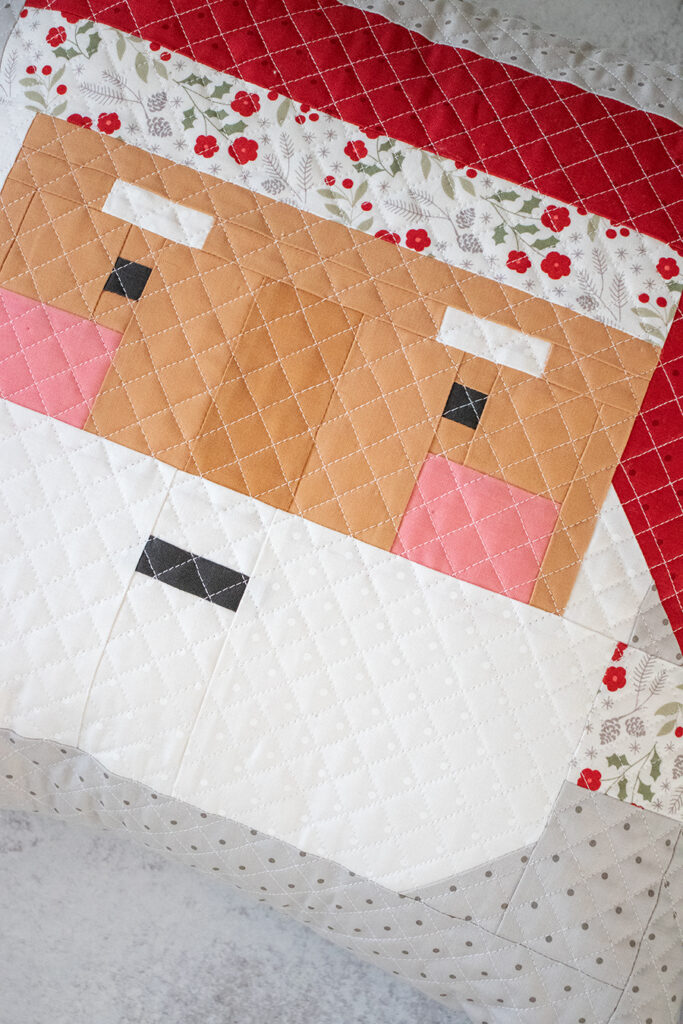
For the Santa pillow, I quilted the pillow-top with a crosshatch design. (I used the hera marker again to create diagonal lines 1/2″ apart in both directions. After they were marked, I simply stitched along the marked lines in both directions. (LOVE how it turned out.) You could also just do some simple straight line quilting.
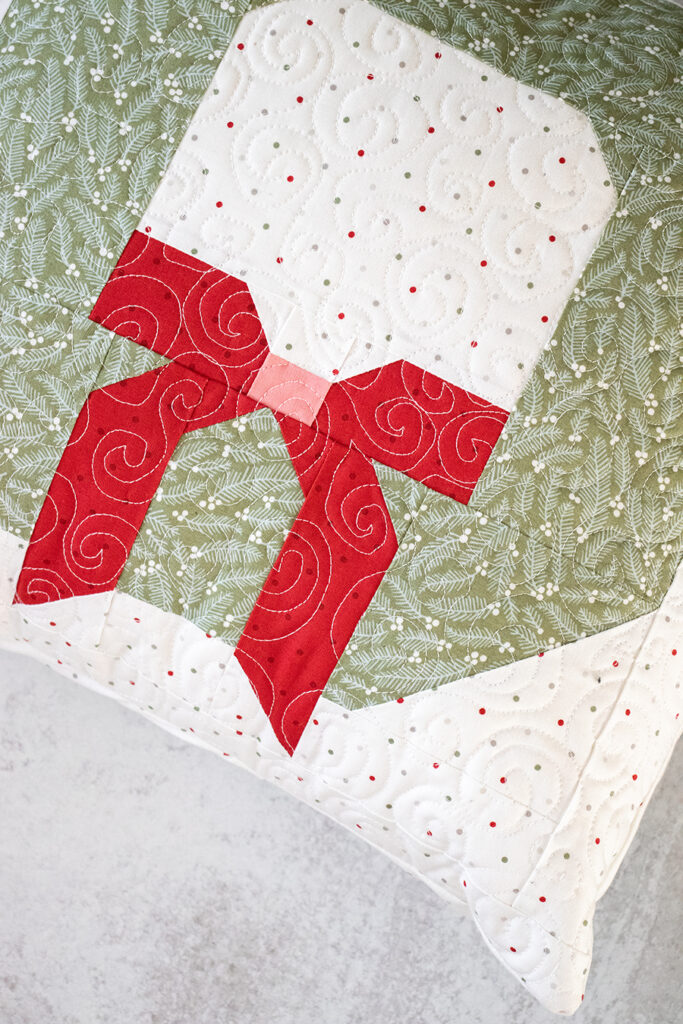
For the wreath pillow, I did some freemotion swirls for the quilting. (For freemotion quilting, you must 1) lower the feed dogs on your machine, 2) use a darning foot, and 3) practice on scraps beforehand!) If you look closely, my swirls are not perfect, but I don’t mind! I think it adds to the handmade charm.
Creating an Envelope Opening
FINISHING MATERIALS:
To complete the pillow, you will need the following finishing materials per pillow:
- 3/8 yard pillow backing fabric
- (1) 18″ pillow form
Cut (2) rectangles 12″ x 18″ from the pillow backing fabric. To each pillow backing rectangle: fold one of the 18″ sides under 3/8″ (wrong sides together) and press. Repeat to fold under another 3/8″ (to hide the raw edge) and press. Top-stitch right along the edge, as well as 1/4″ away from the edge.
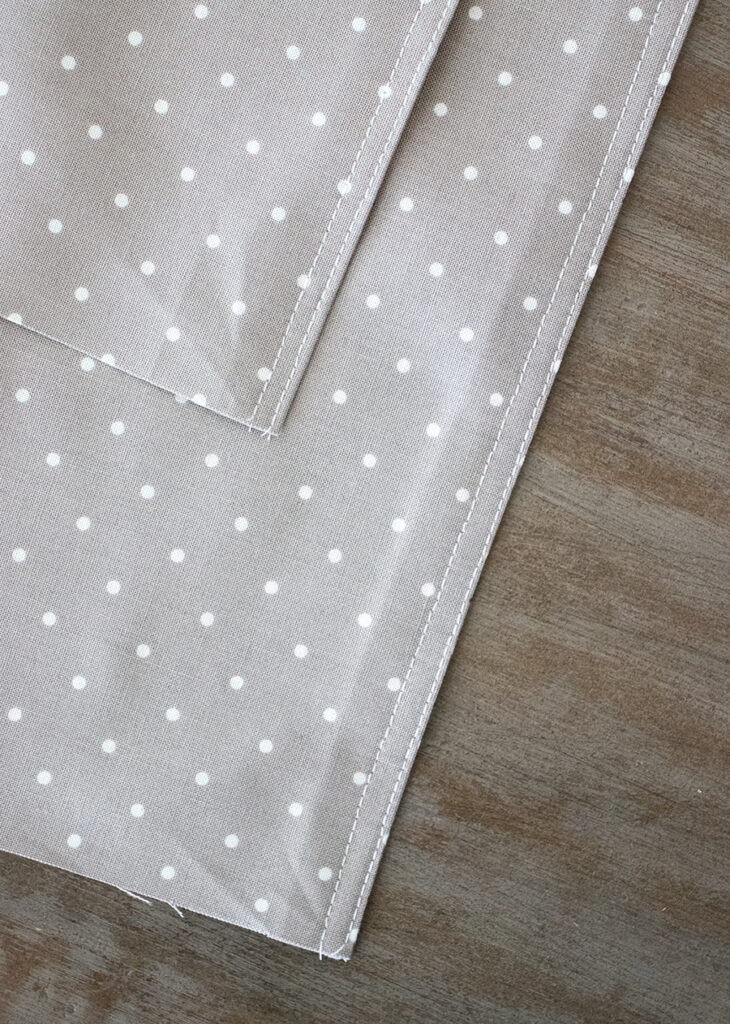
Next, bring each pillow backing rectangle right sides together with the pillow-top – aligning the raw edges along the sides so the finished edges overlap the center. I like to use Wonder Clips to “pin” those thick layers in place.
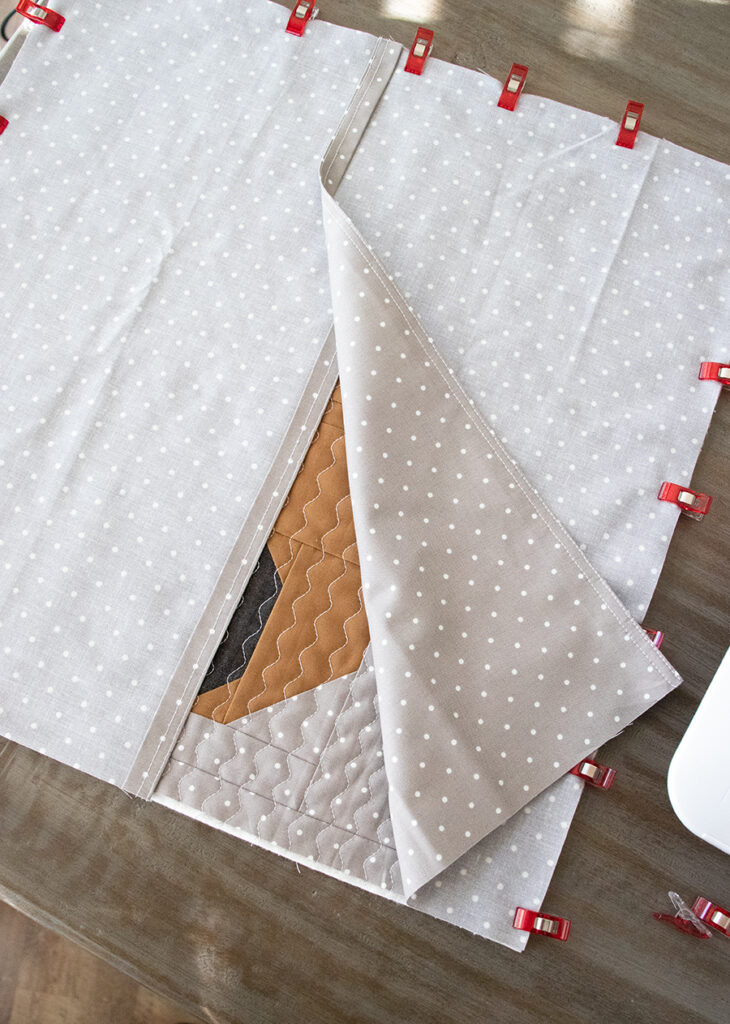
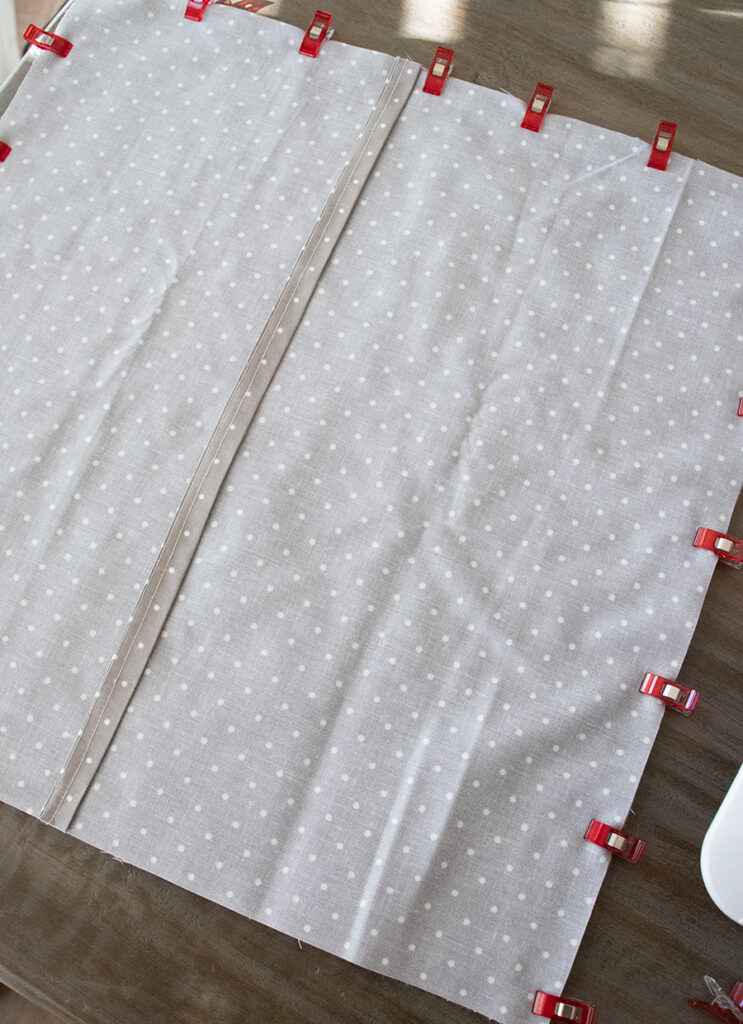
Sew around the perimeter 1/2″ in from the edge. Clip the excess from the corners, taking care to not cut into the seam. Turn right-side out through the envelope-backing. Insert an 18″ pillow form through the back and ta-da! You’ve got yourself a cute little batch of handmade Christmas pillows.
More Pillow Ideas
Here are a few more pillow options from the Christmas Eve pattern collection:
- The trees from #217 “Reindeer Xing”
- The geometric block from #215 “Dashing“
- The plaid block from #216 “Forever Plaid”
(Just make sure to add 1″ borders to get them to 18″ x 18″ like we did for the reindeer pillow.)

I hope this was helpful. If you have any questions, please leave a comment!
Like this post? Drop your email in the box below to get new post notifications via email.
Leave a Reply
You must be logged in to post a comment.
7 Comments
Debi Sherman
November 10, 2022 at 10:13 amThank you so much! I love to make pillows to match my quilts:)
Donna Charlton
November 11, 2022 at 3:57 pmThese pillows are precious! Thank you for sharing your talent with us all!!
Shirley
November 12, 2022 at 10:17 amThank you very much for providing the details needed to make these beautiful pillows. I purchased all three patterns so that I could make the pillows and the quilts, can’t wait for more ideas and for my Christmas Eve fabric to arrive in May.
Arienne La Barrie
November 28, 2022 at 12:04 pmI just finished the top for the Santa pillow, it turned out SO cute! I also just purchased the Deer. I will be sure to tag you on Instagram when they’re both done! 🙂
lellaboutique
November 28, 2022 at 1:21 pmOh yay! Can’t wait to see them!
Theresa
December 5, 2022 at 11:55 amWill there be a kit for the quilt or pillow.
lellaboutique
December 5, 2022 at 1:51 pmHi Theresa!
I won’t be carrying kits but you should definitely reach out to your favorite local / online shop for one. (Some shops will even let you preorder.) Feel free to share the pillow kit lists to help them put one together 🙂